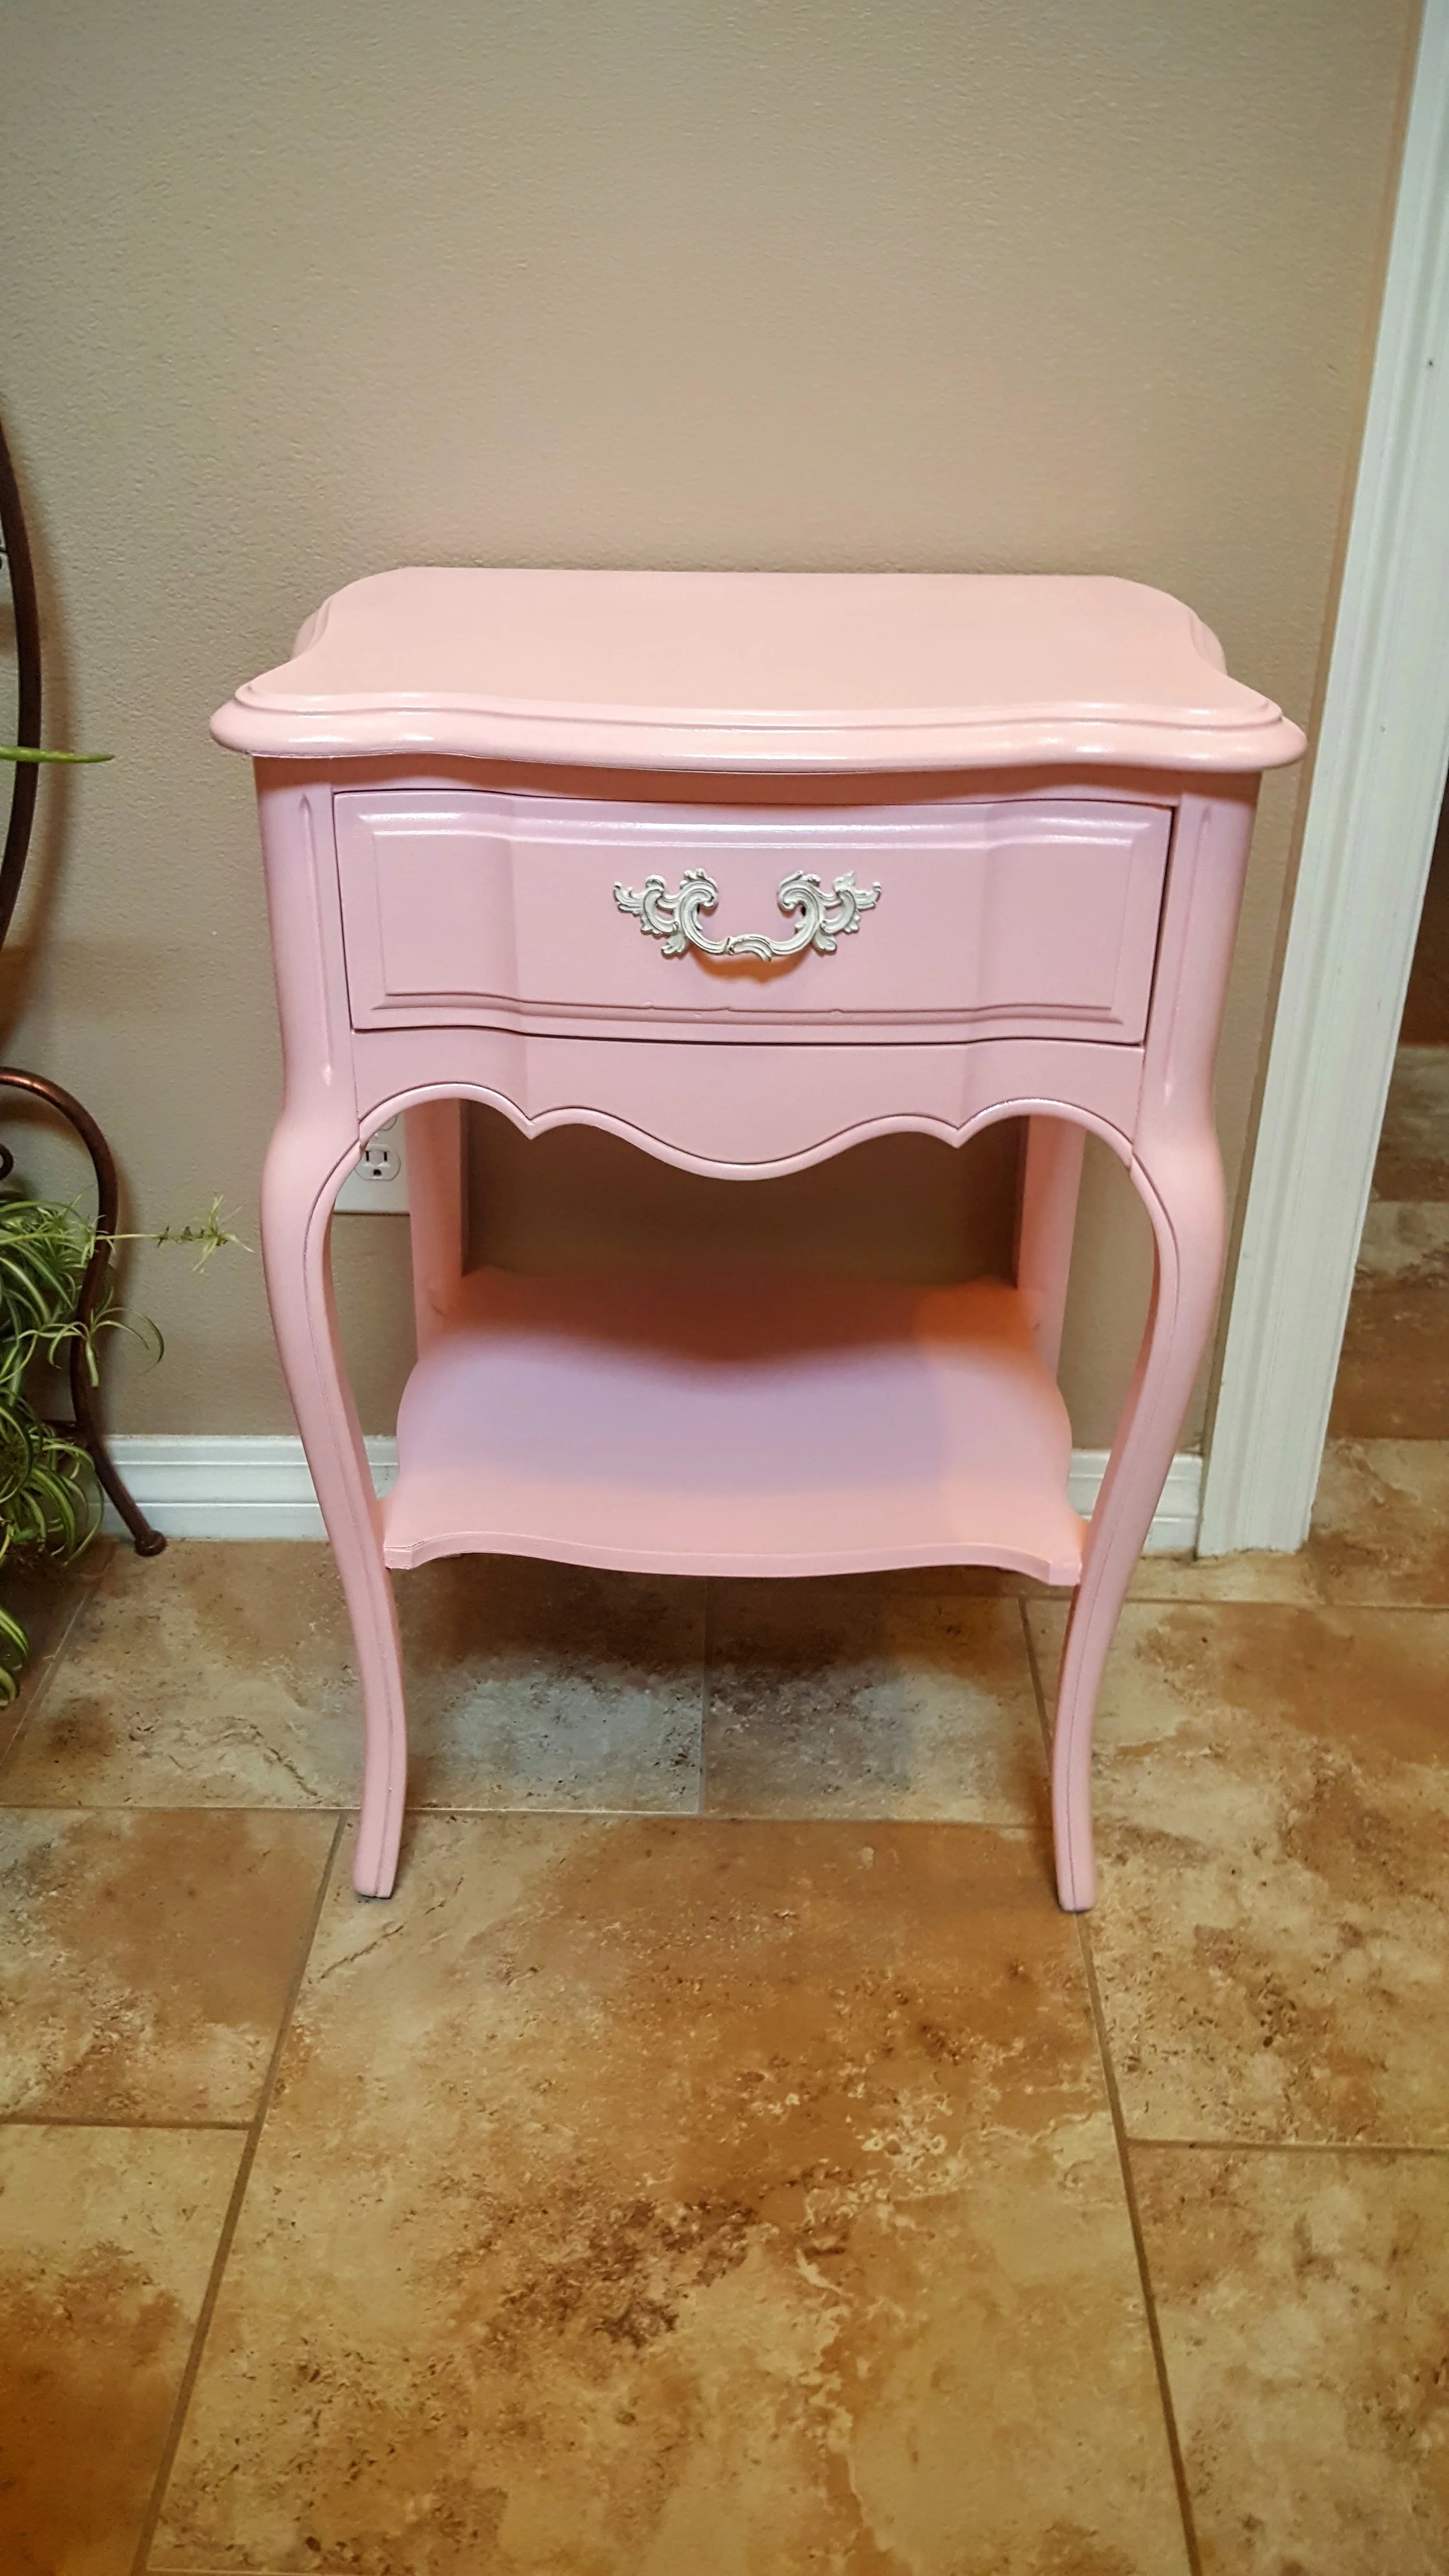
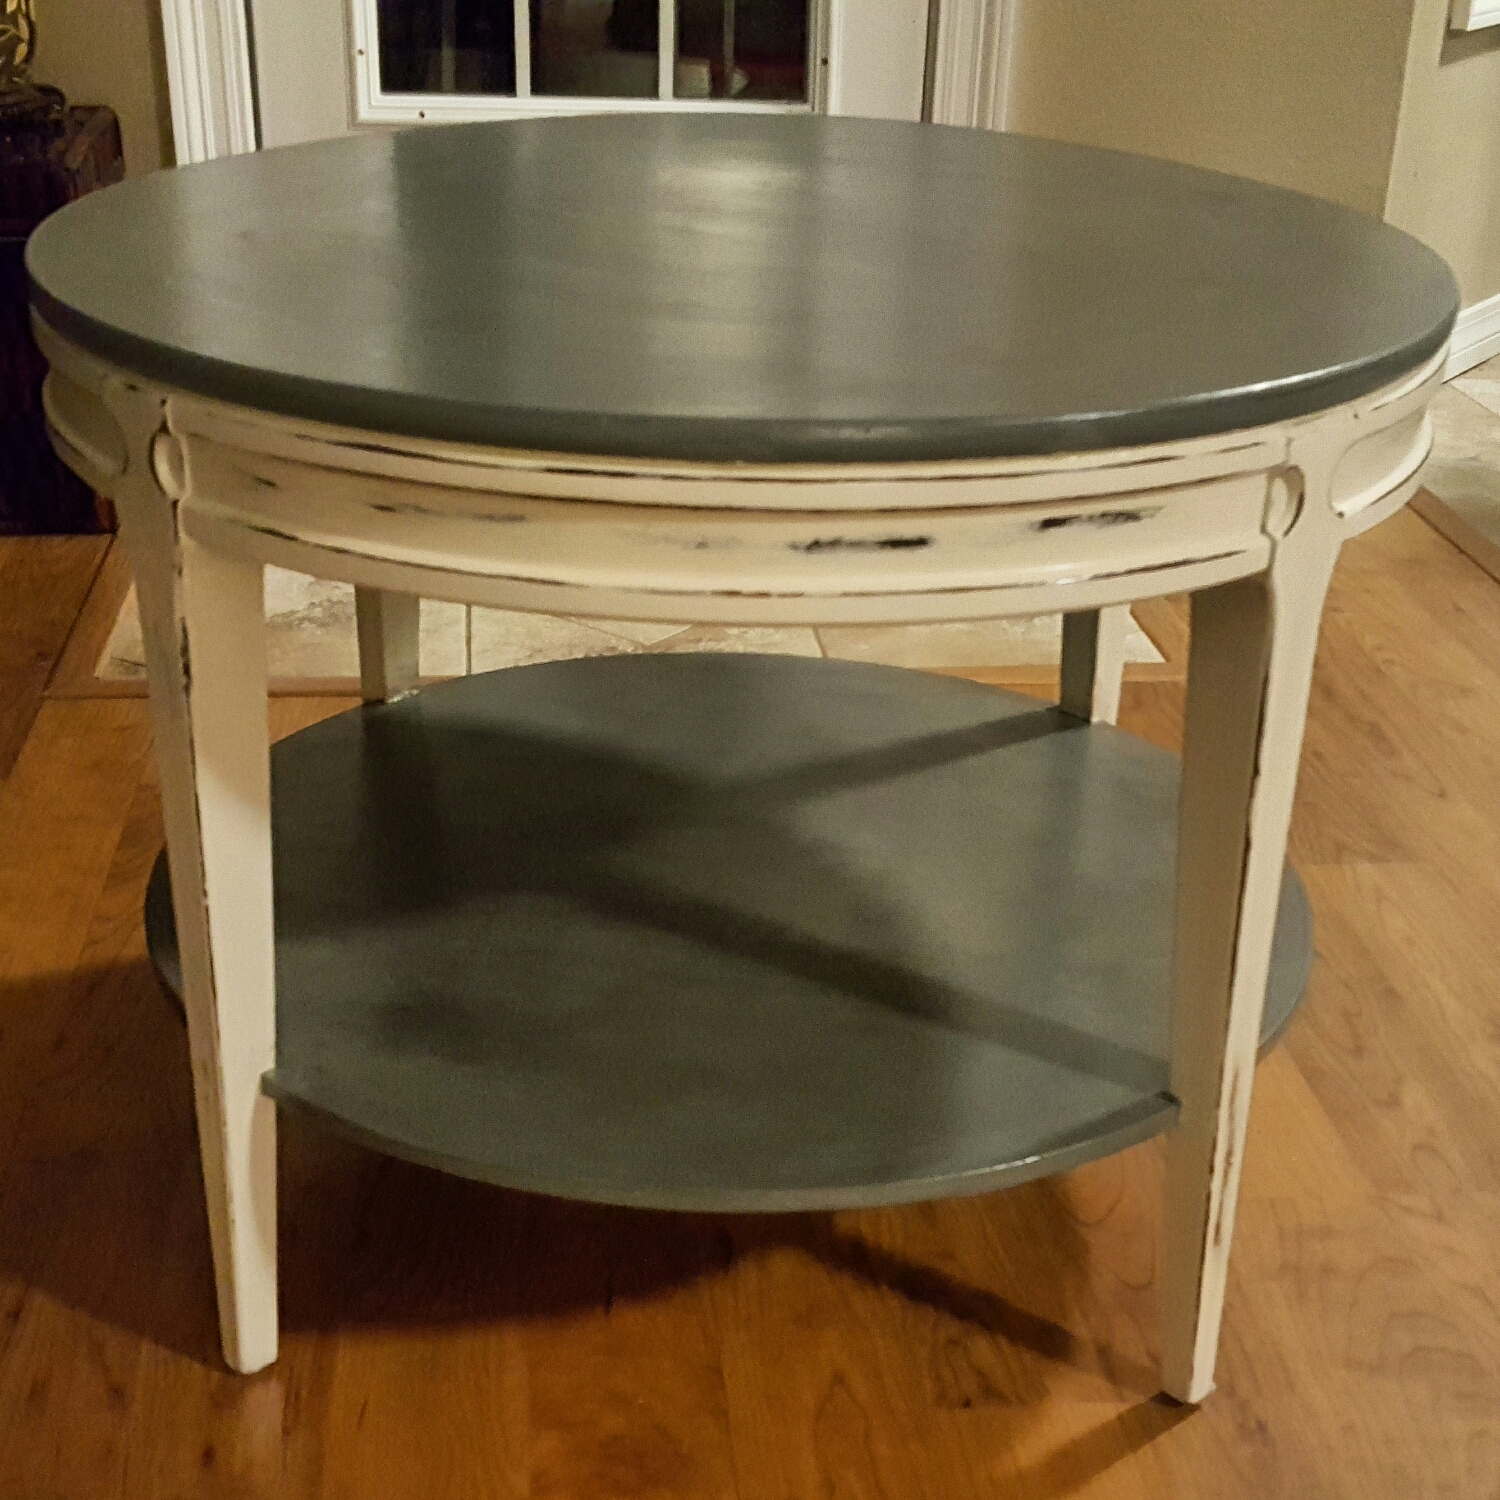
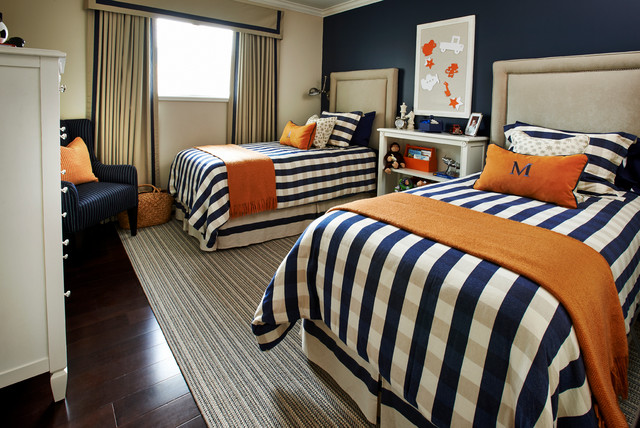
Refinished Nightstand Between Twin Beds in Kids' Guest Room

20160713_142026 (1).jpg

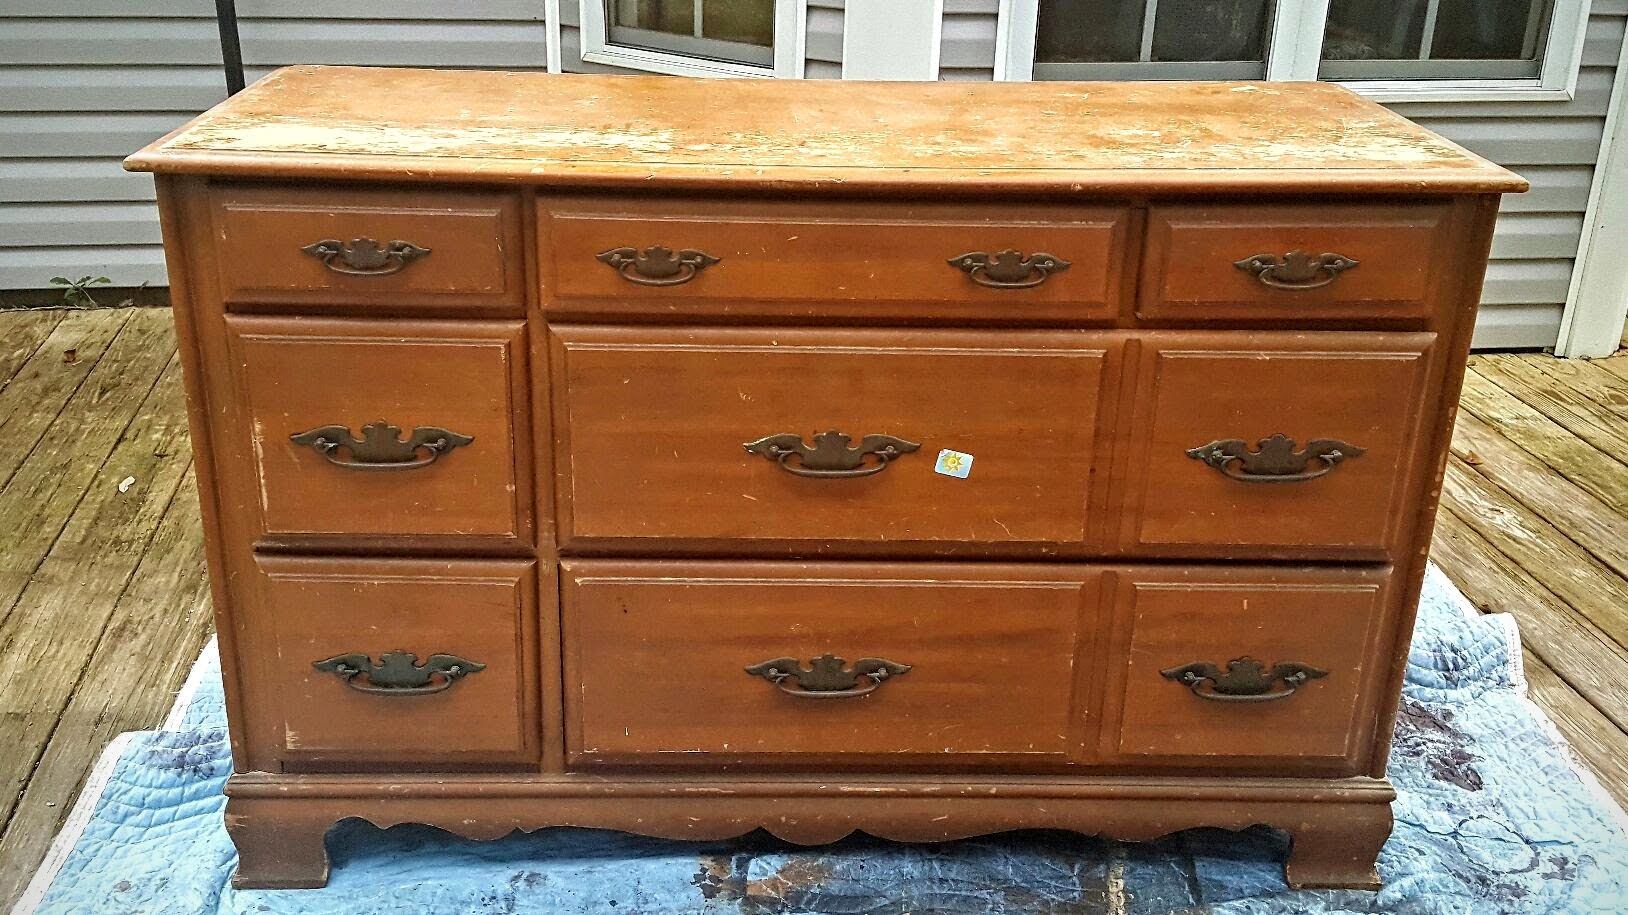
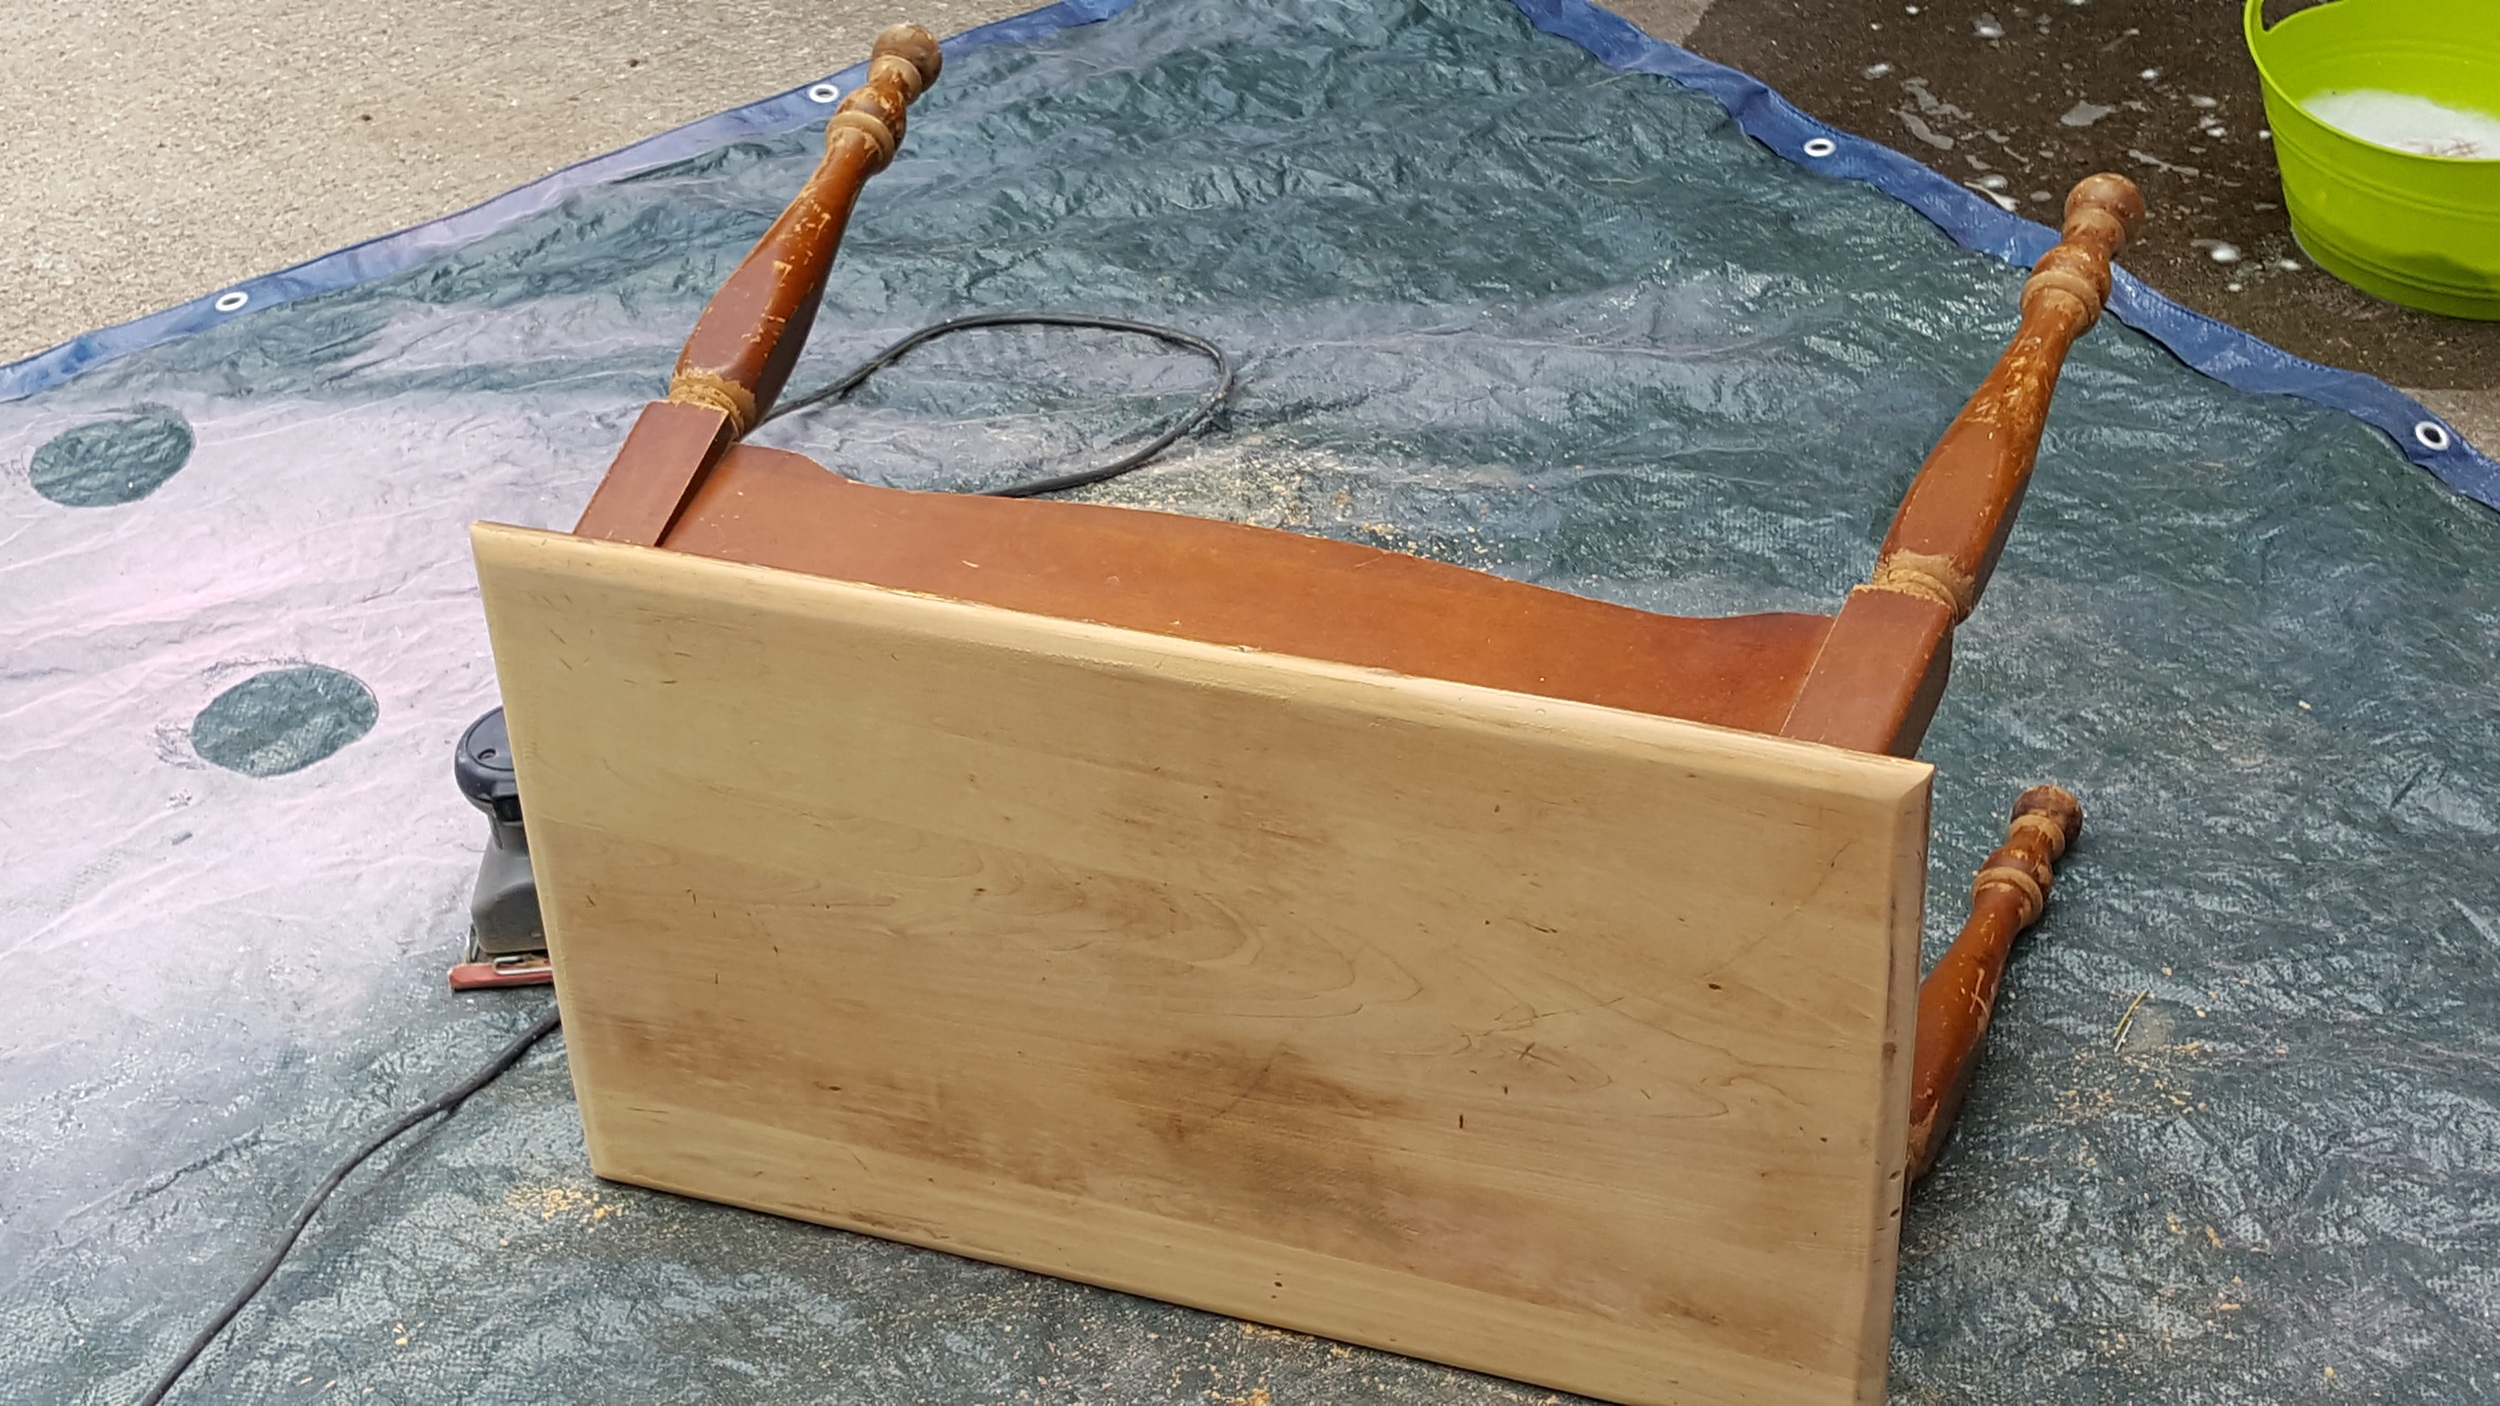
When looking for pieces to refinish, do yourself a favor and choose REAL WOOD pieces only.  Don't get cute and get stuck with some particle board you won't be able to do anything with except paint.  Nothing wrong with painting, of course, but the great thing about real wood is that if you screw up...you can start over.  No problem.  If you don't like it...you can start over.  No problem.  

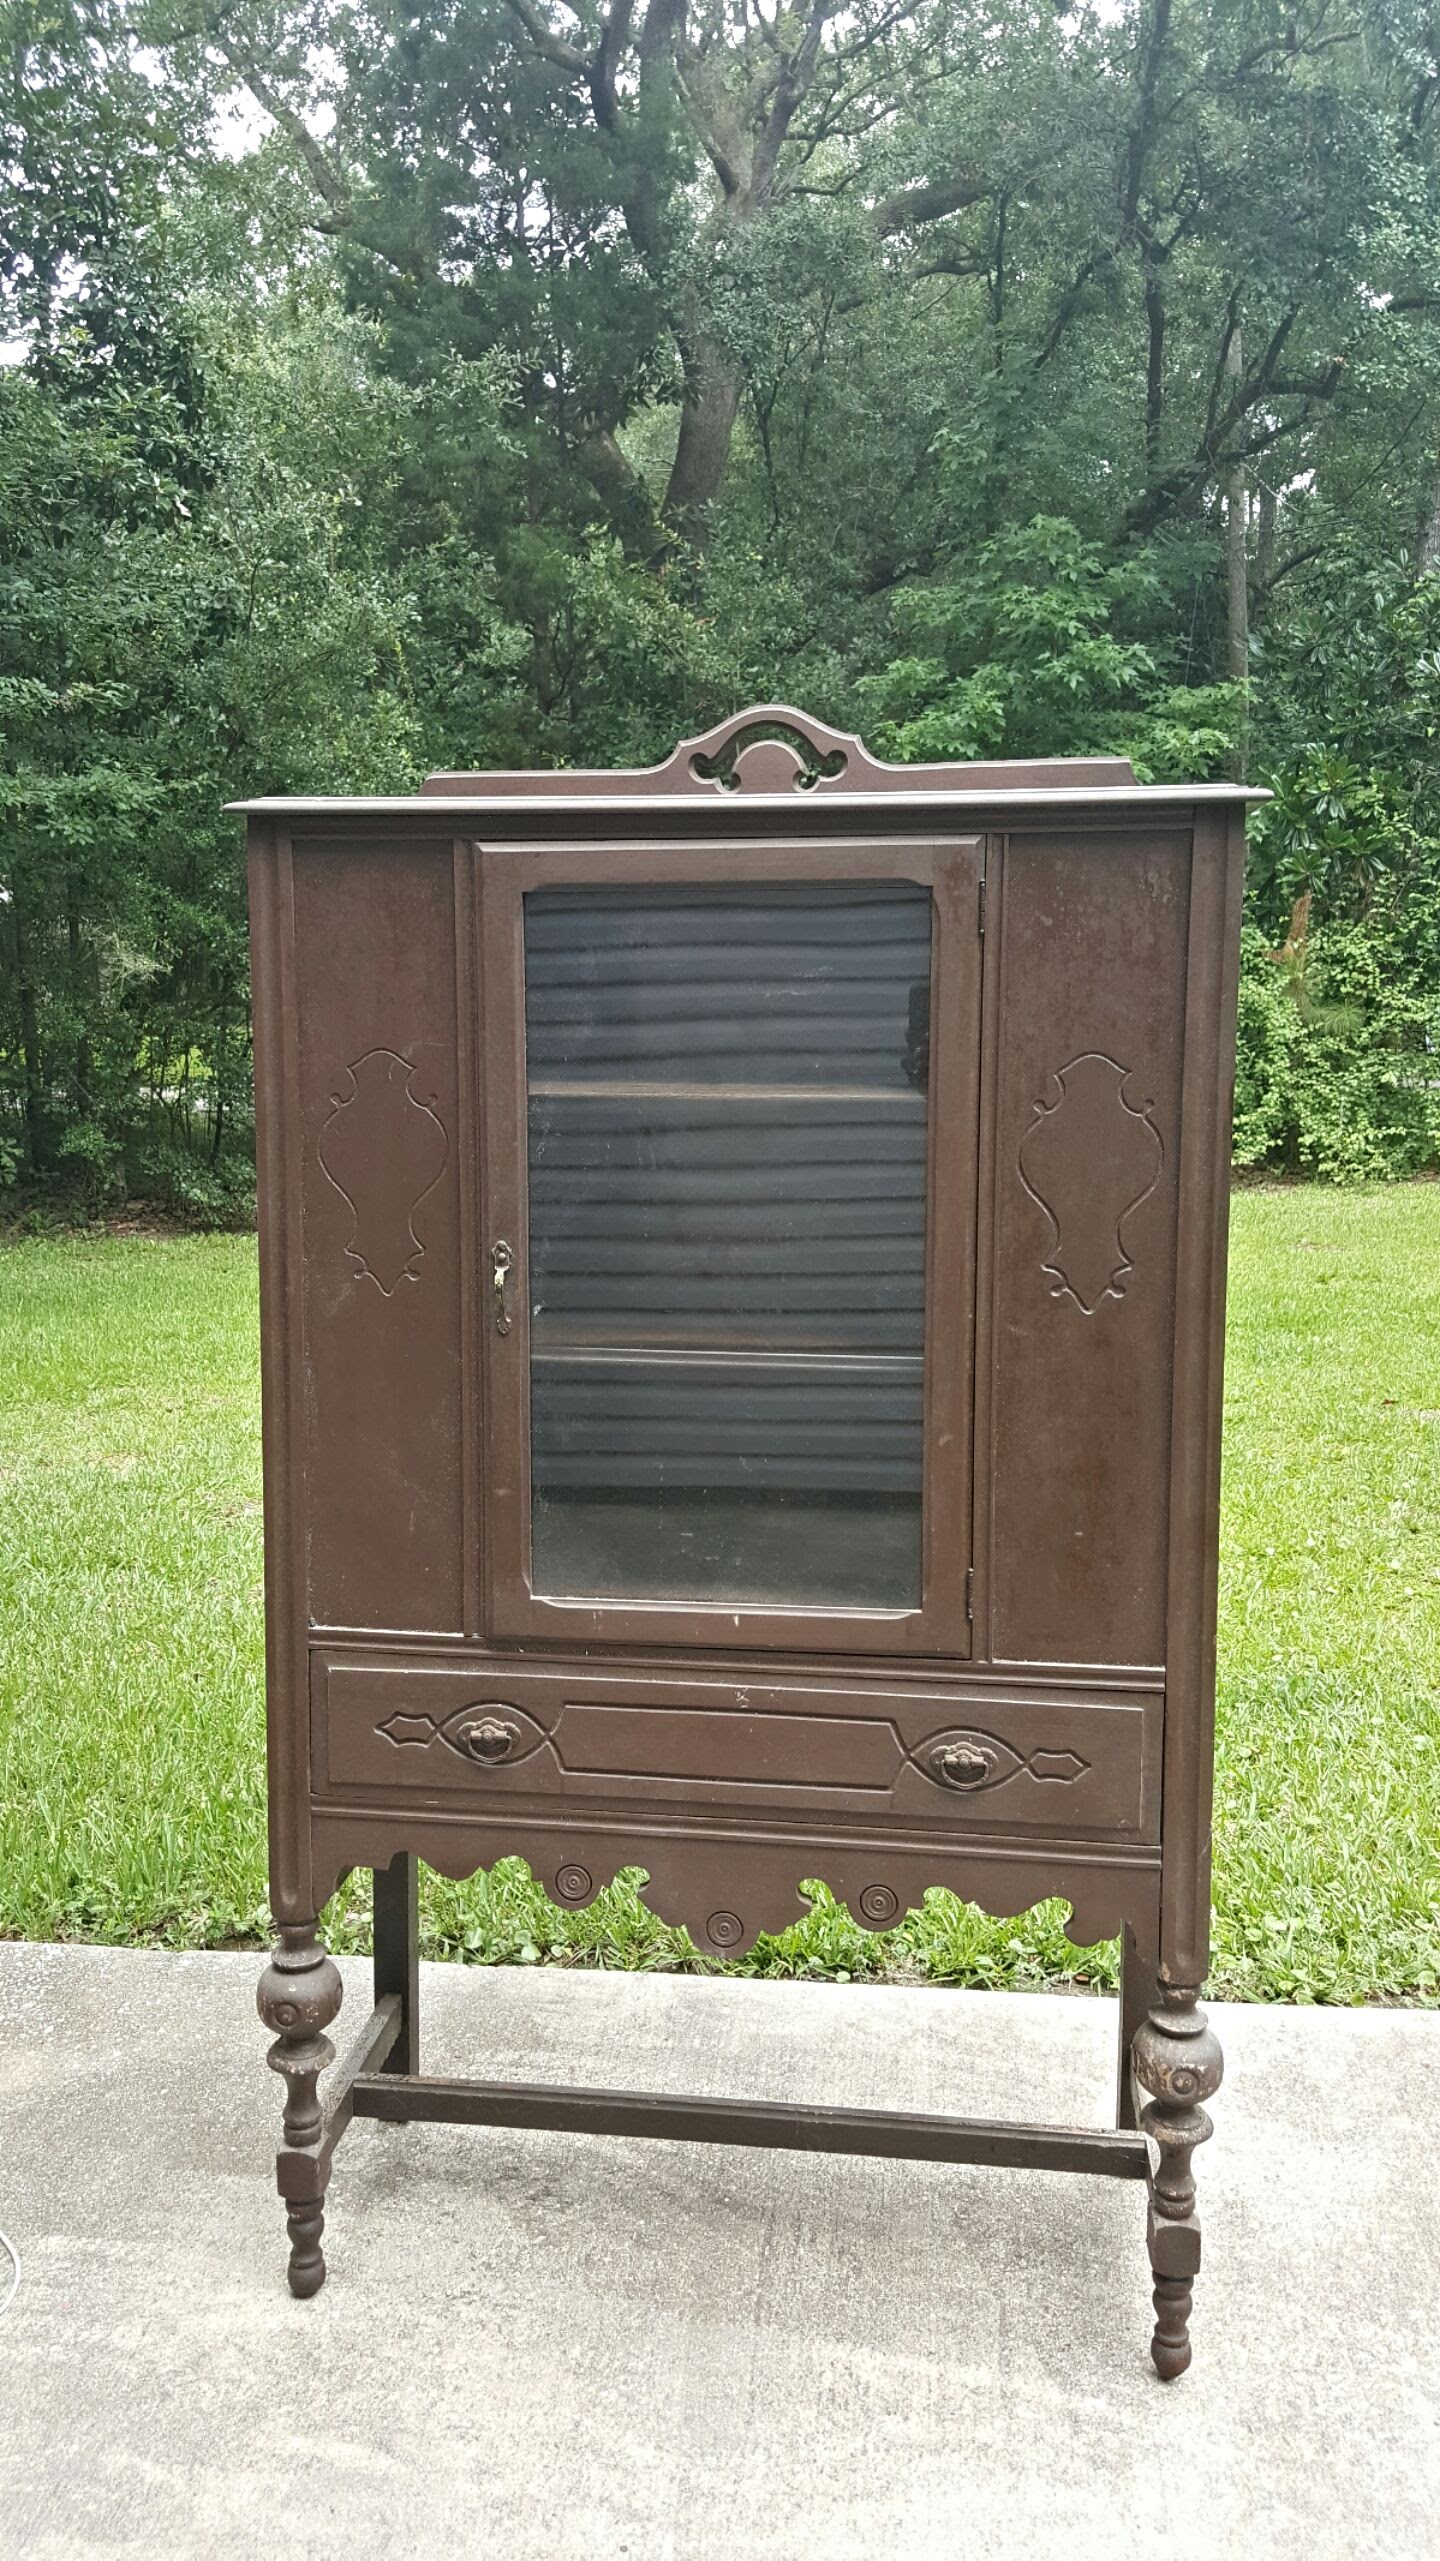
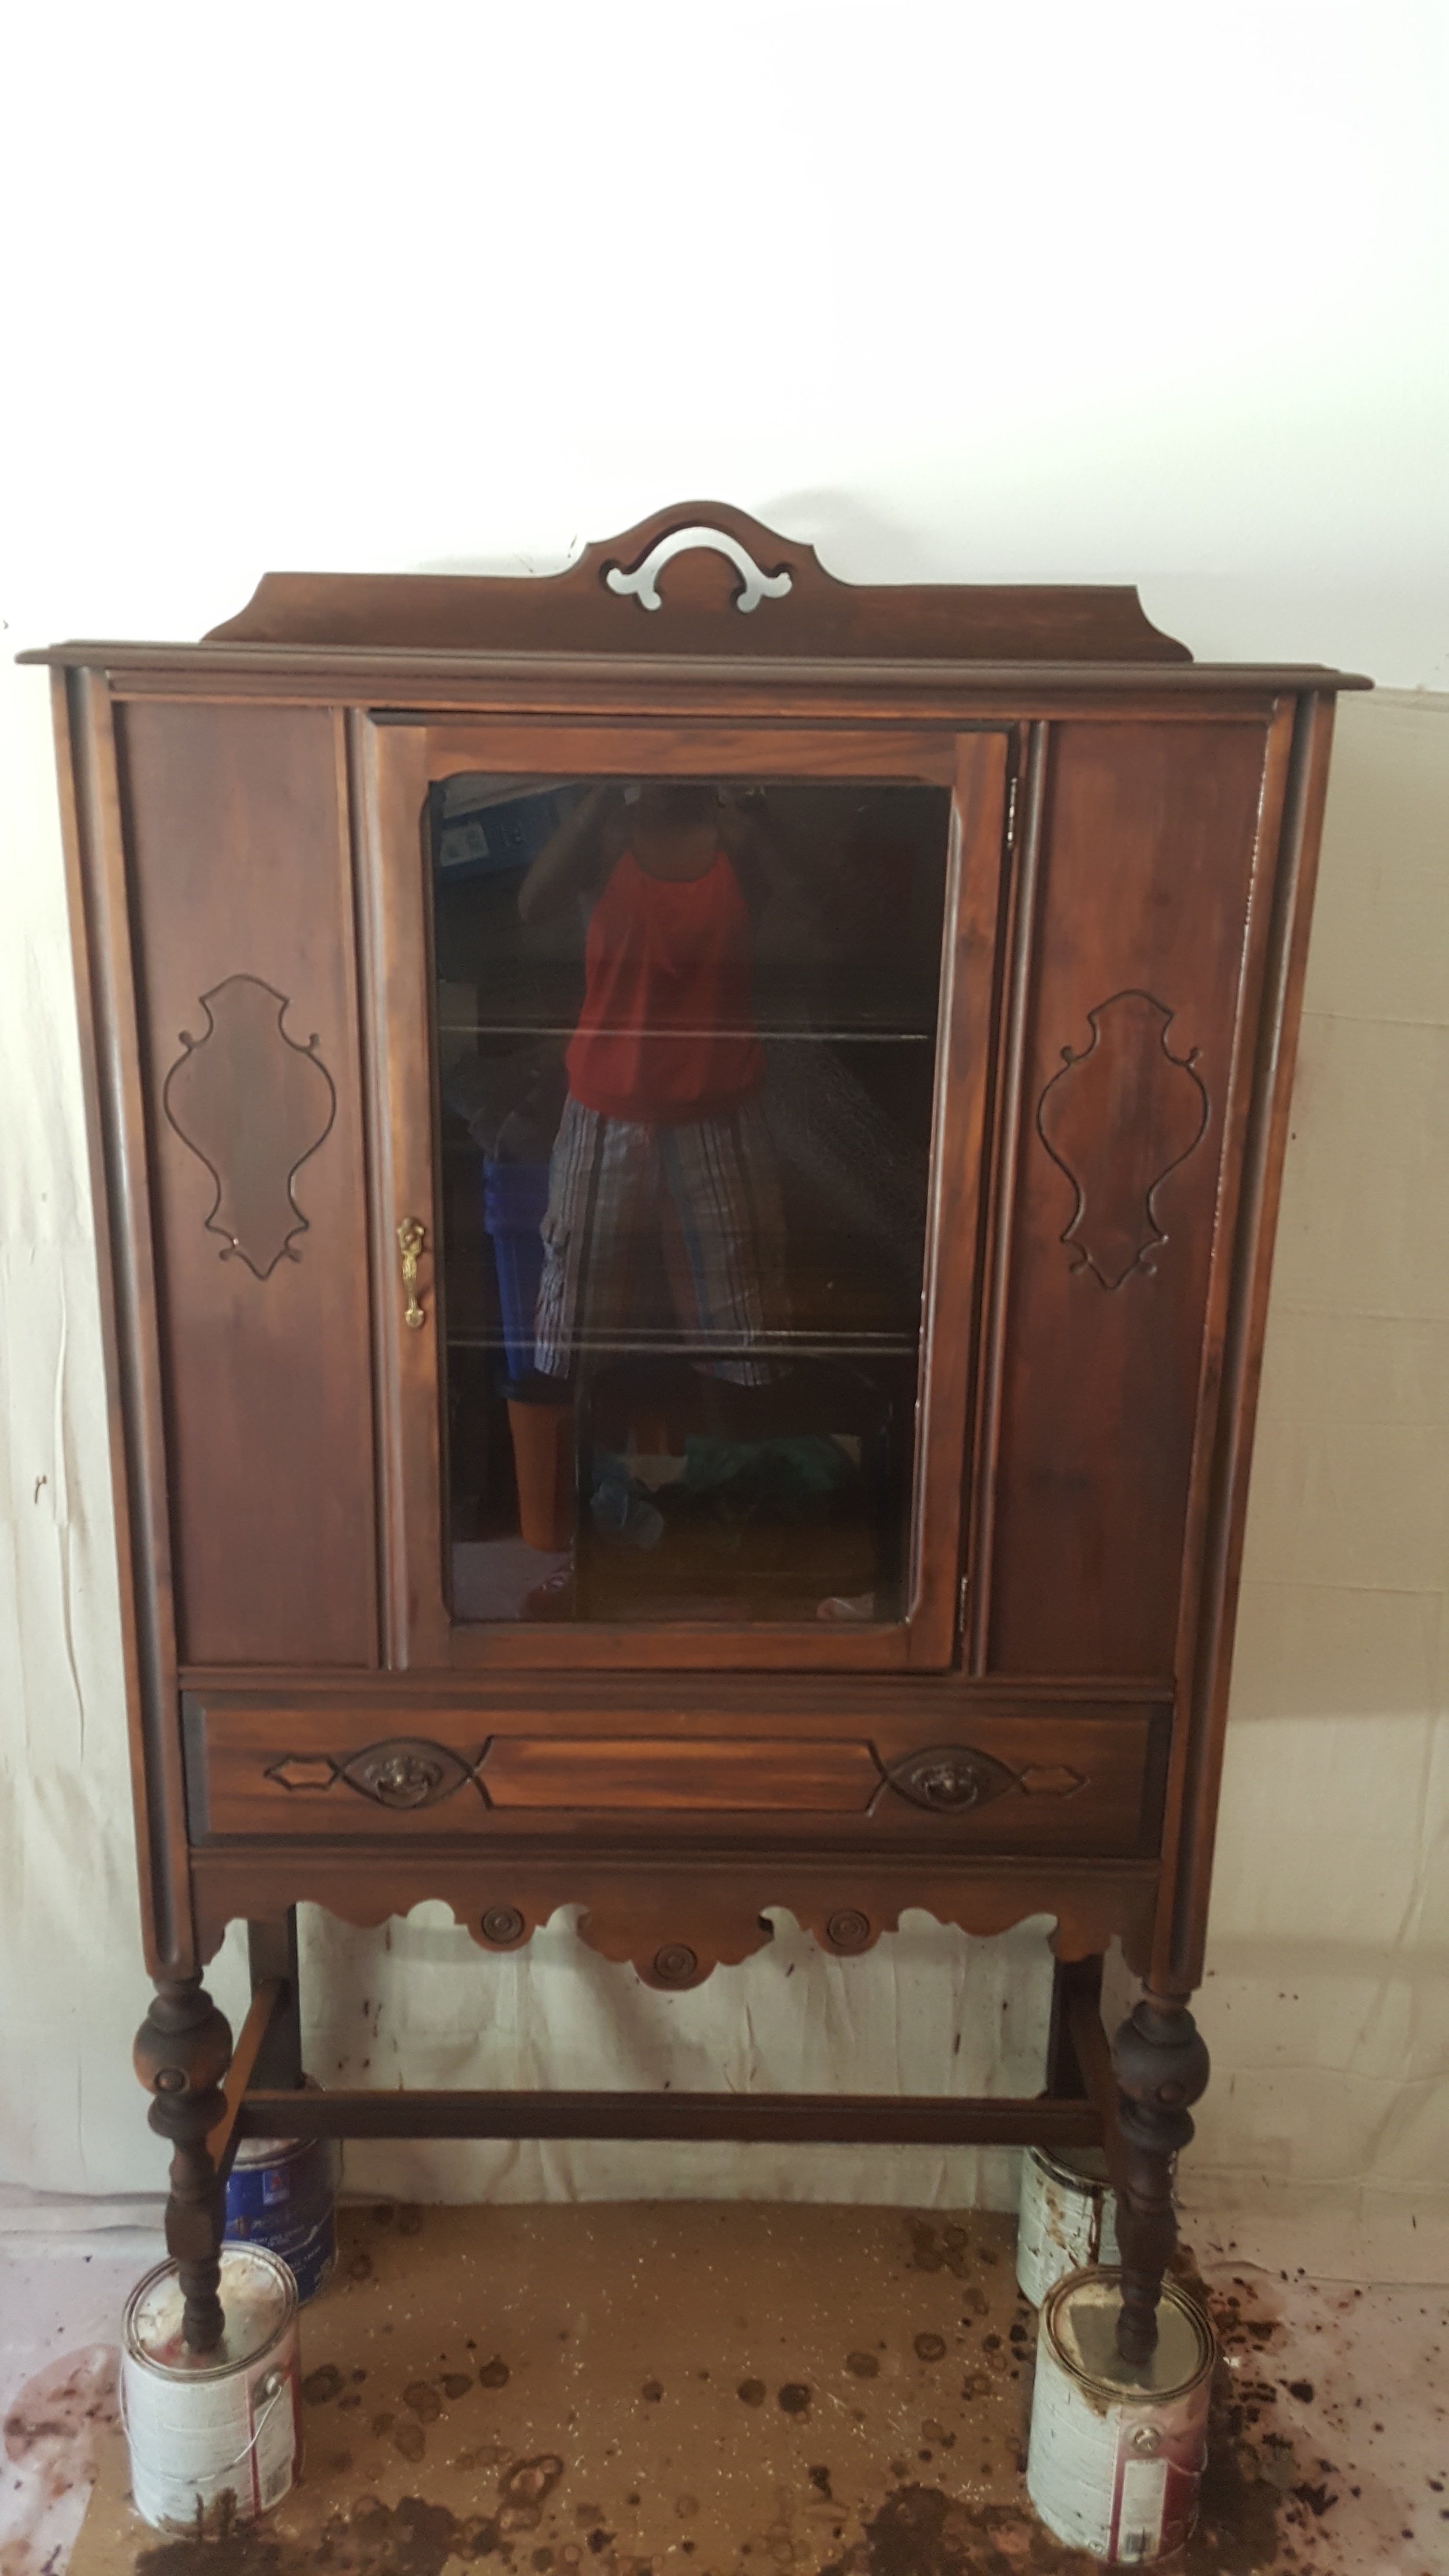
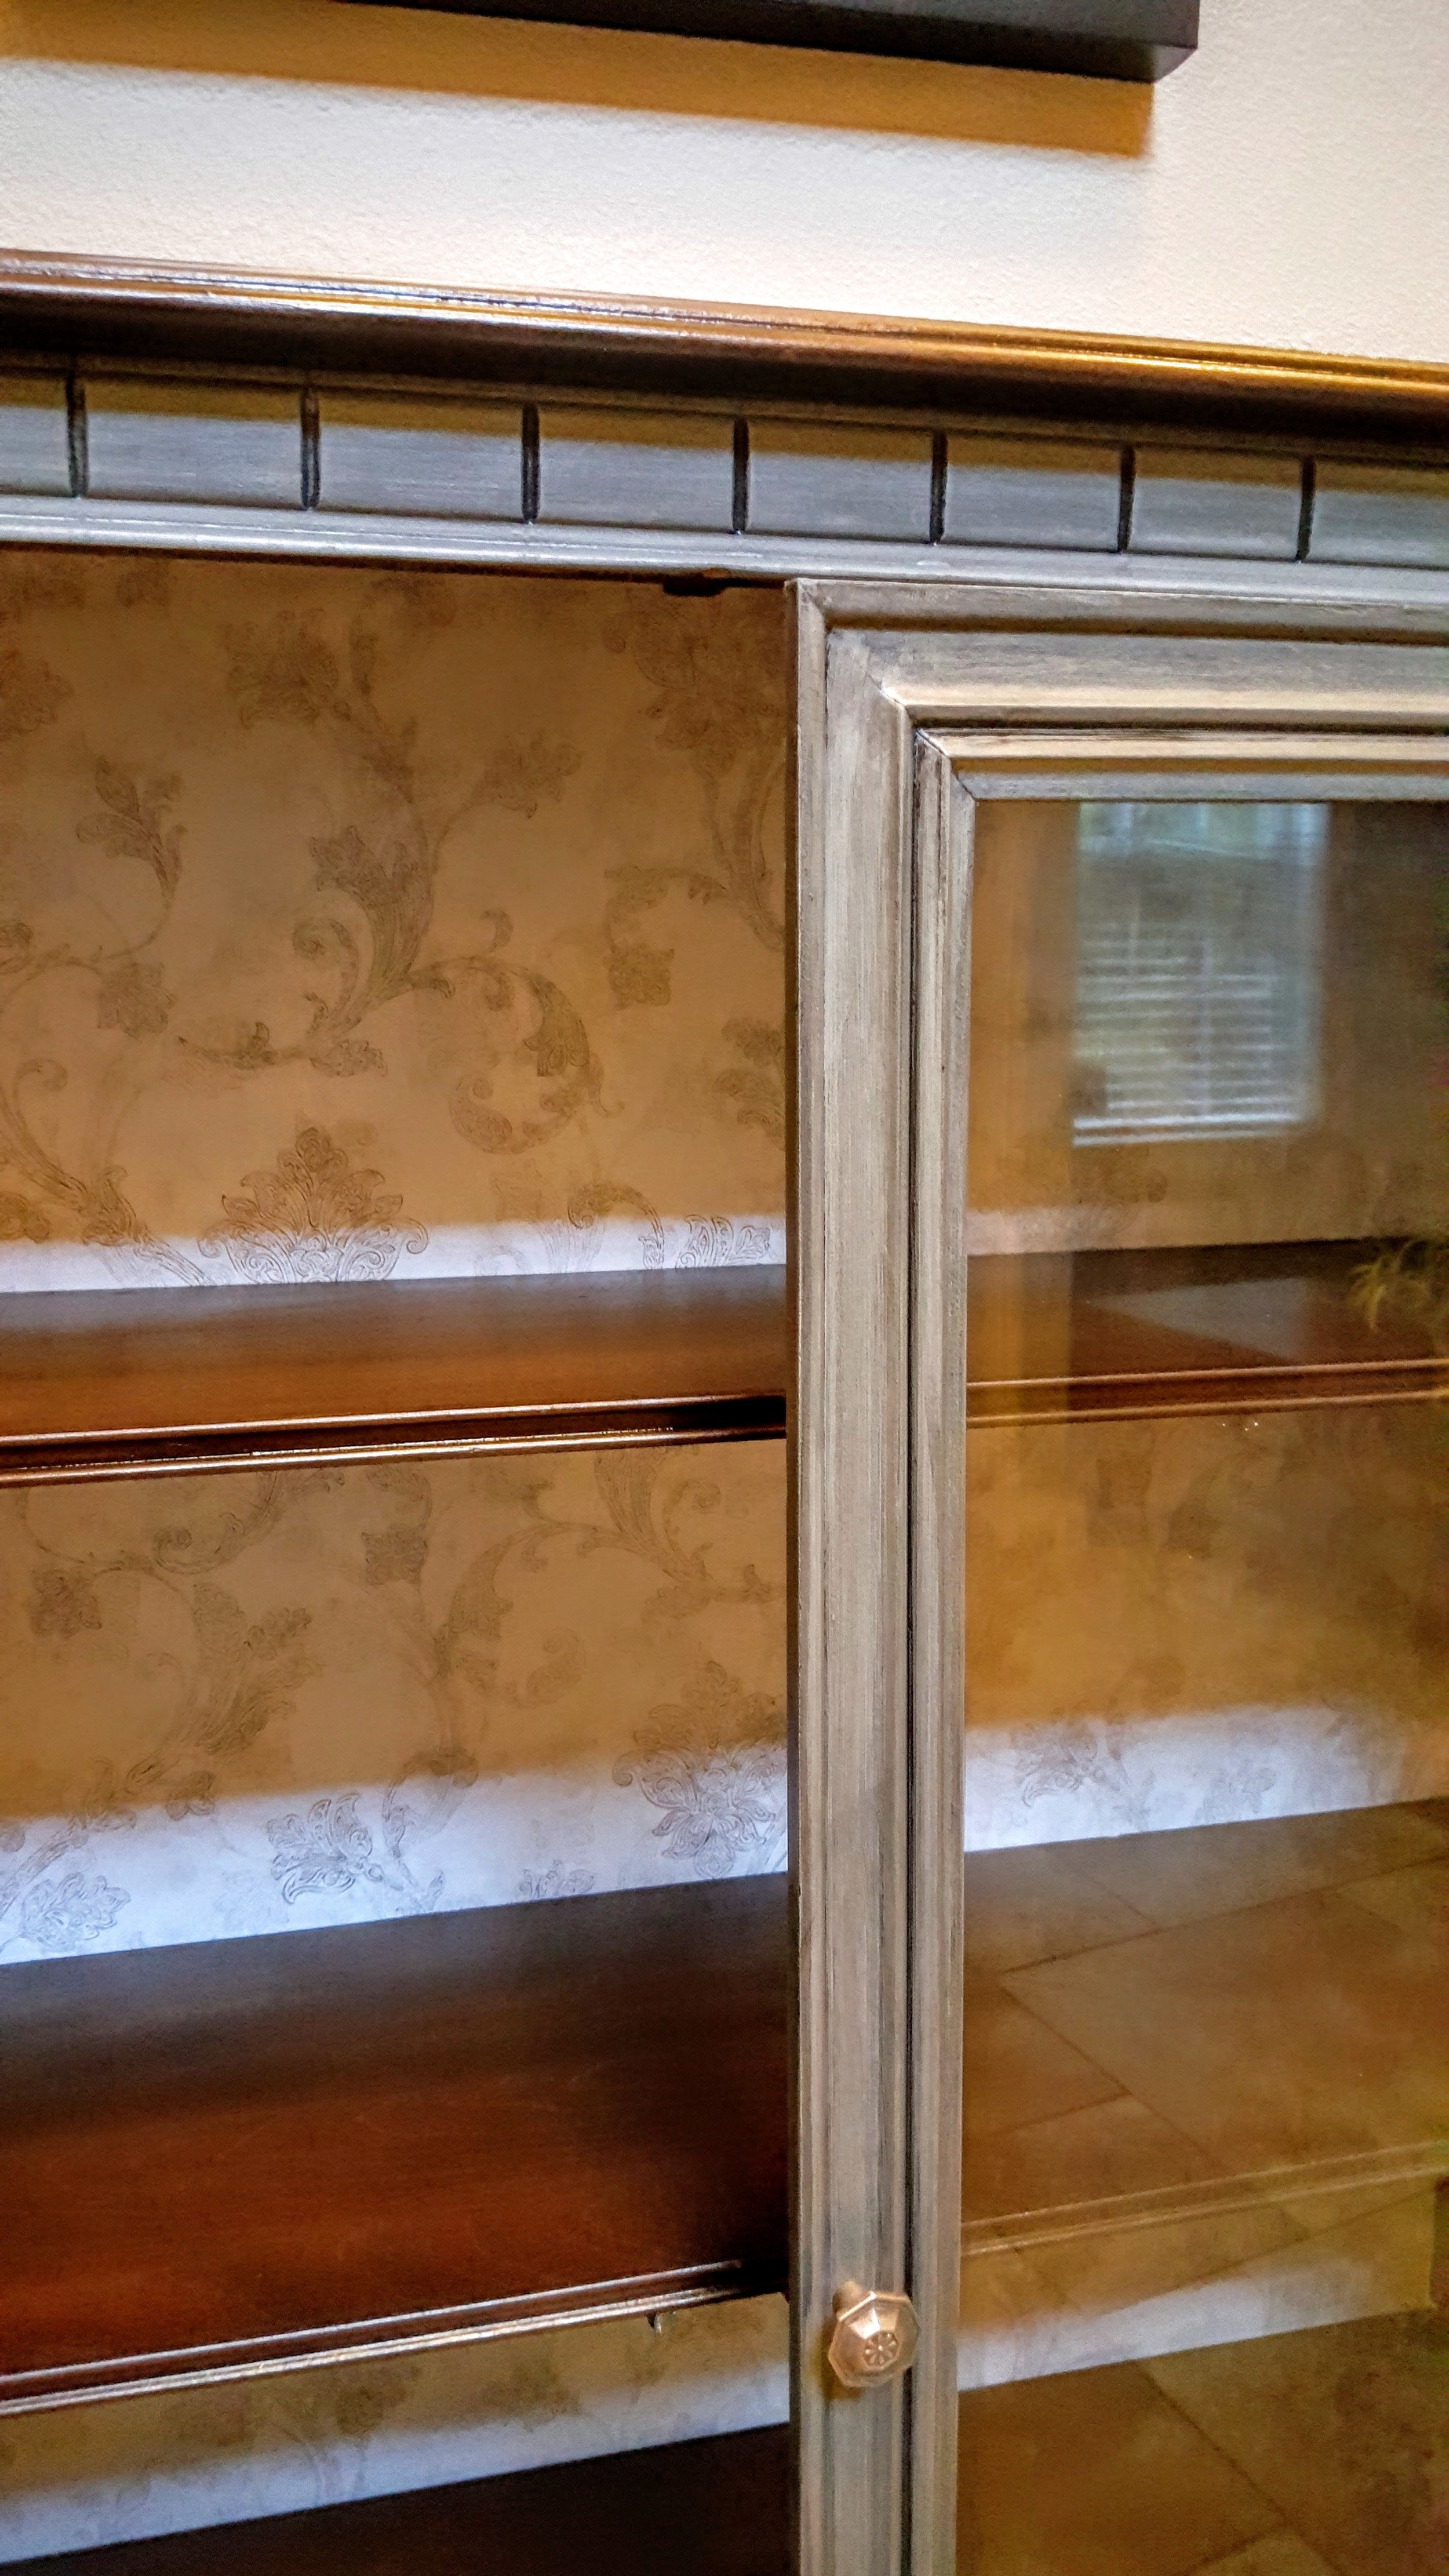
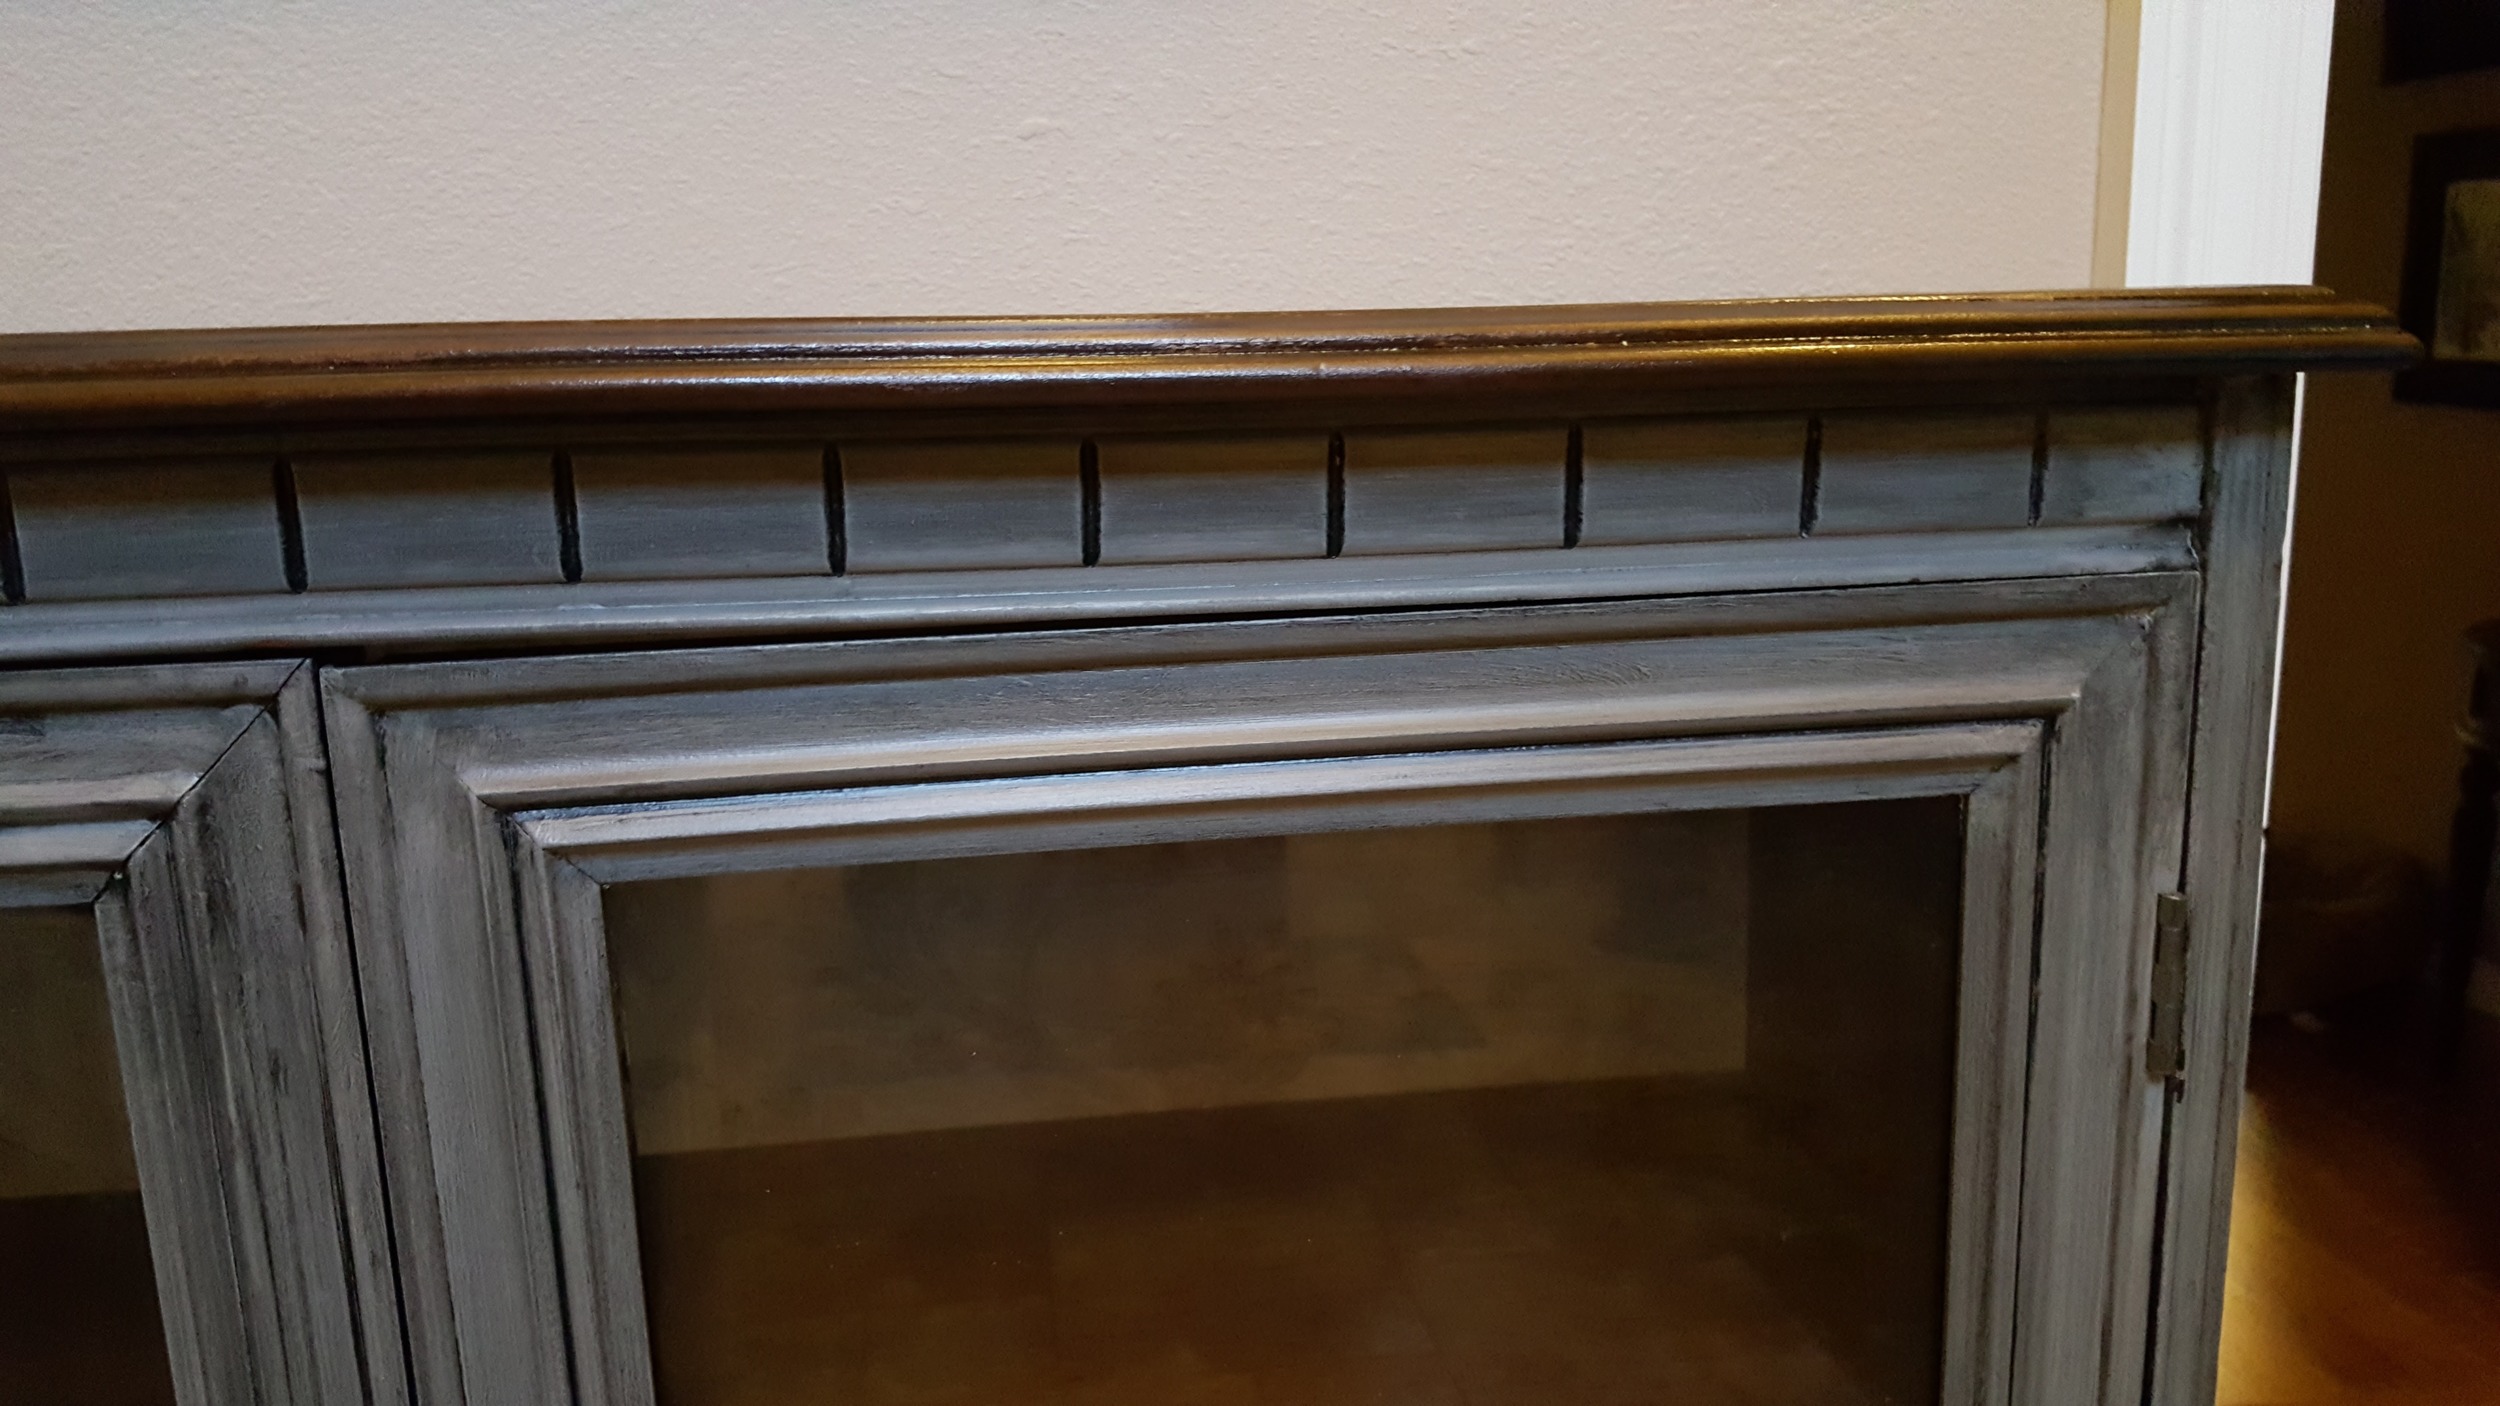
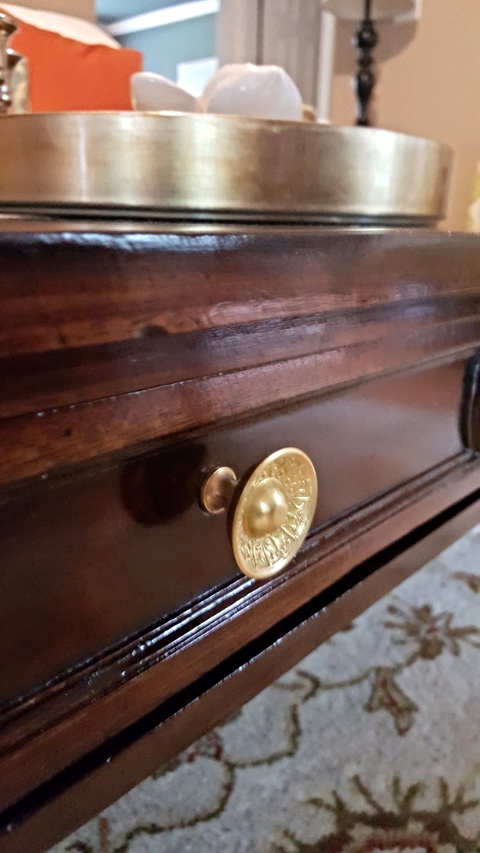
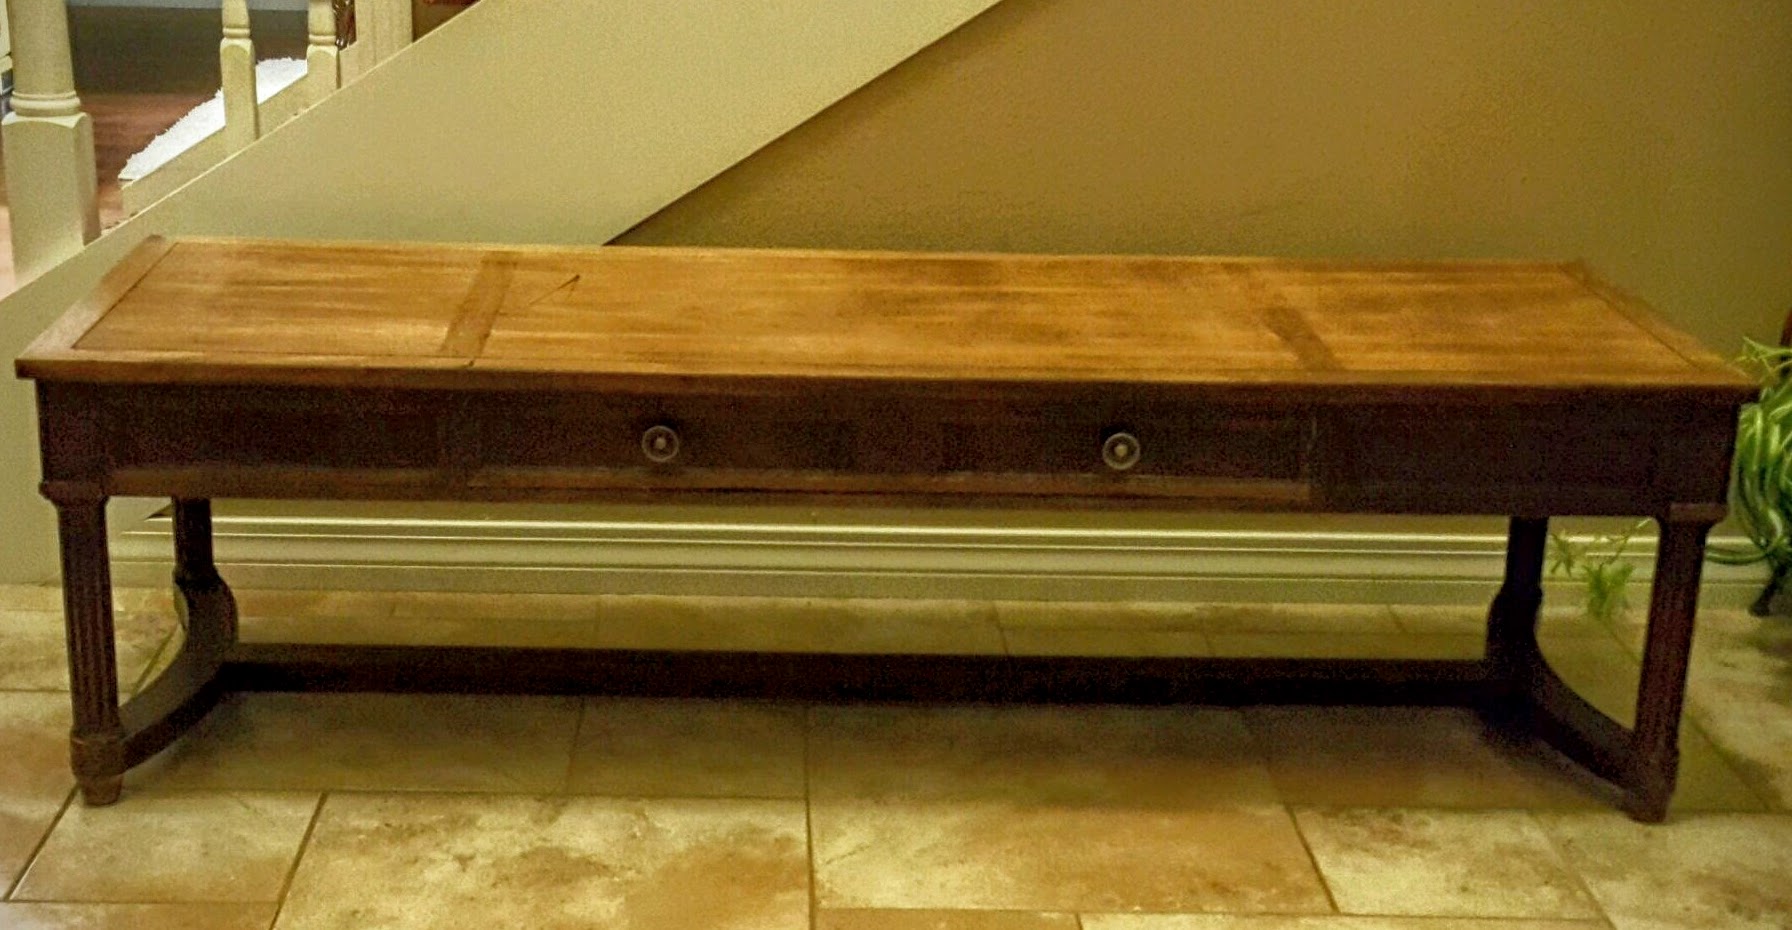
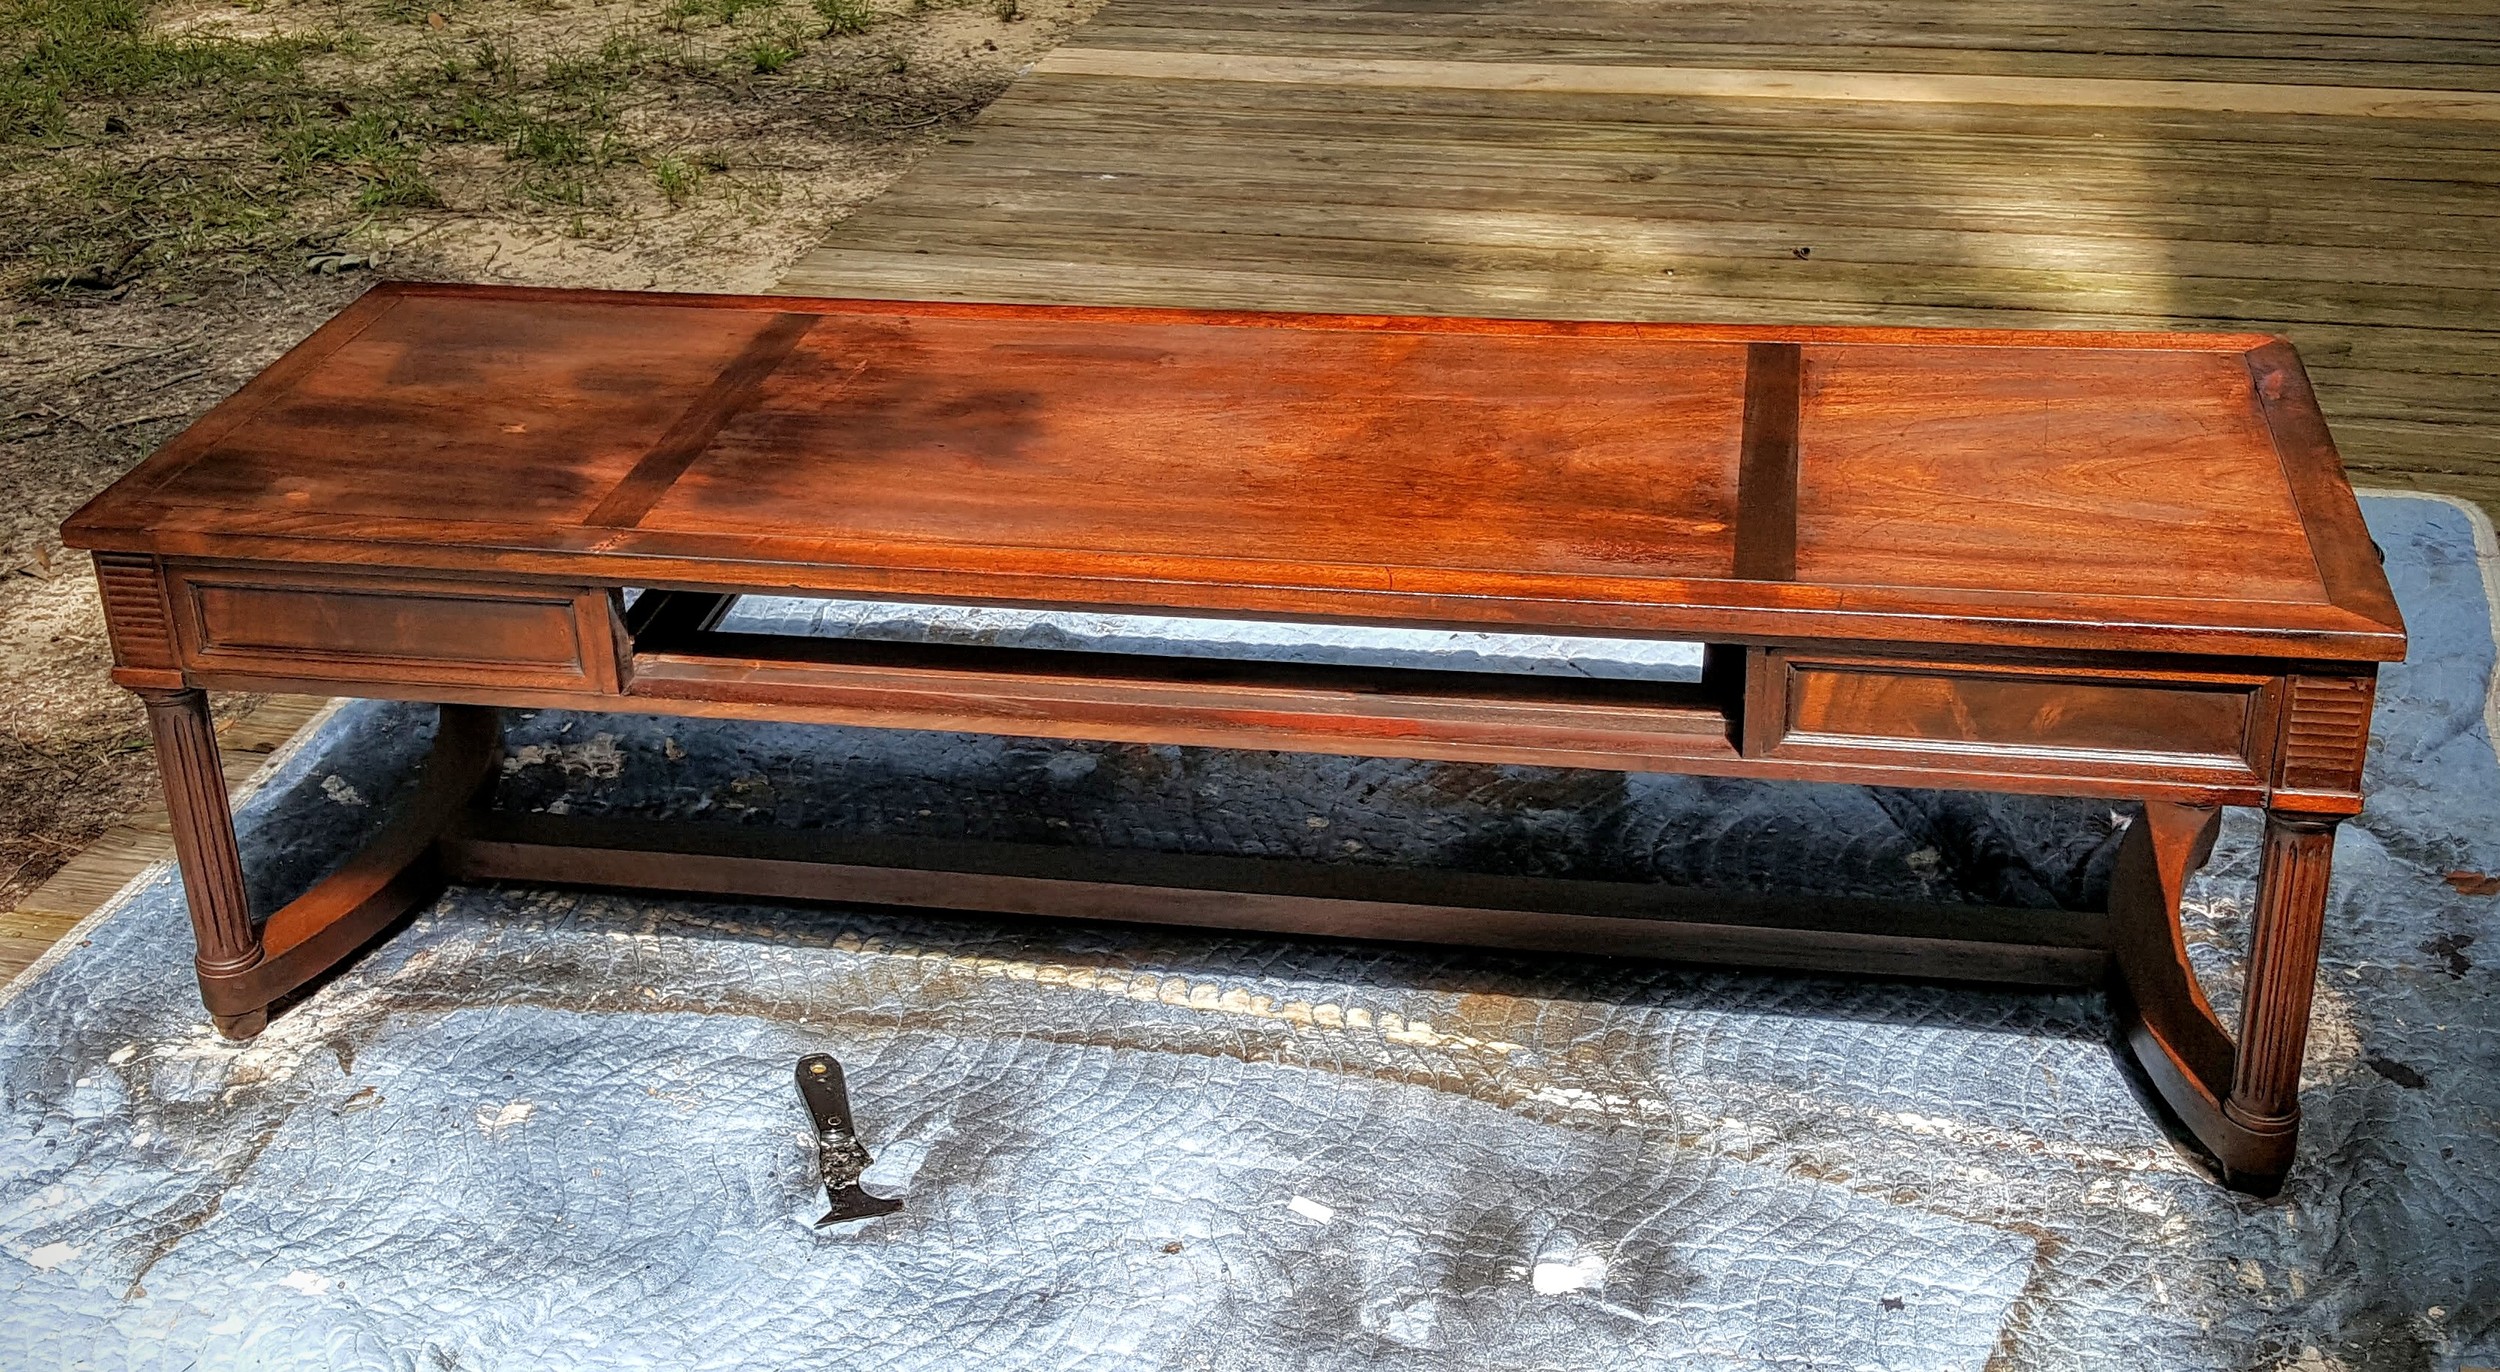
This piece had something I hate.  A non-working "drawer."  Like...there was a drawer pull on it and a fake line to simulate a drawer but it was just a side.  I was looking for a nightstand to put between the kids' guest bedroom.  It has twin beds and not enough room for two end tables so I needed to be pretty specific with size.  Also...I didn't want it to be too tall.  Initially, I was going to use a bookcase but struggled with lamp placement.  Since it's a guest room, something with a drawer isn't necessary and I've since put a low basket with a liner under it to hold books.  

Still working on the room for now, of course.  I'm planning to do a light colored wall behind the beds and decorate it with stars.  Why?  I like stars.  Duh.  LOL!  Funny because my nephew is currently visiting and he has his own ideas of design and implemented them accordingly.  *sigh*  He's quite proud of his handiwork.  What say you?  Think he has a future in interior decor?

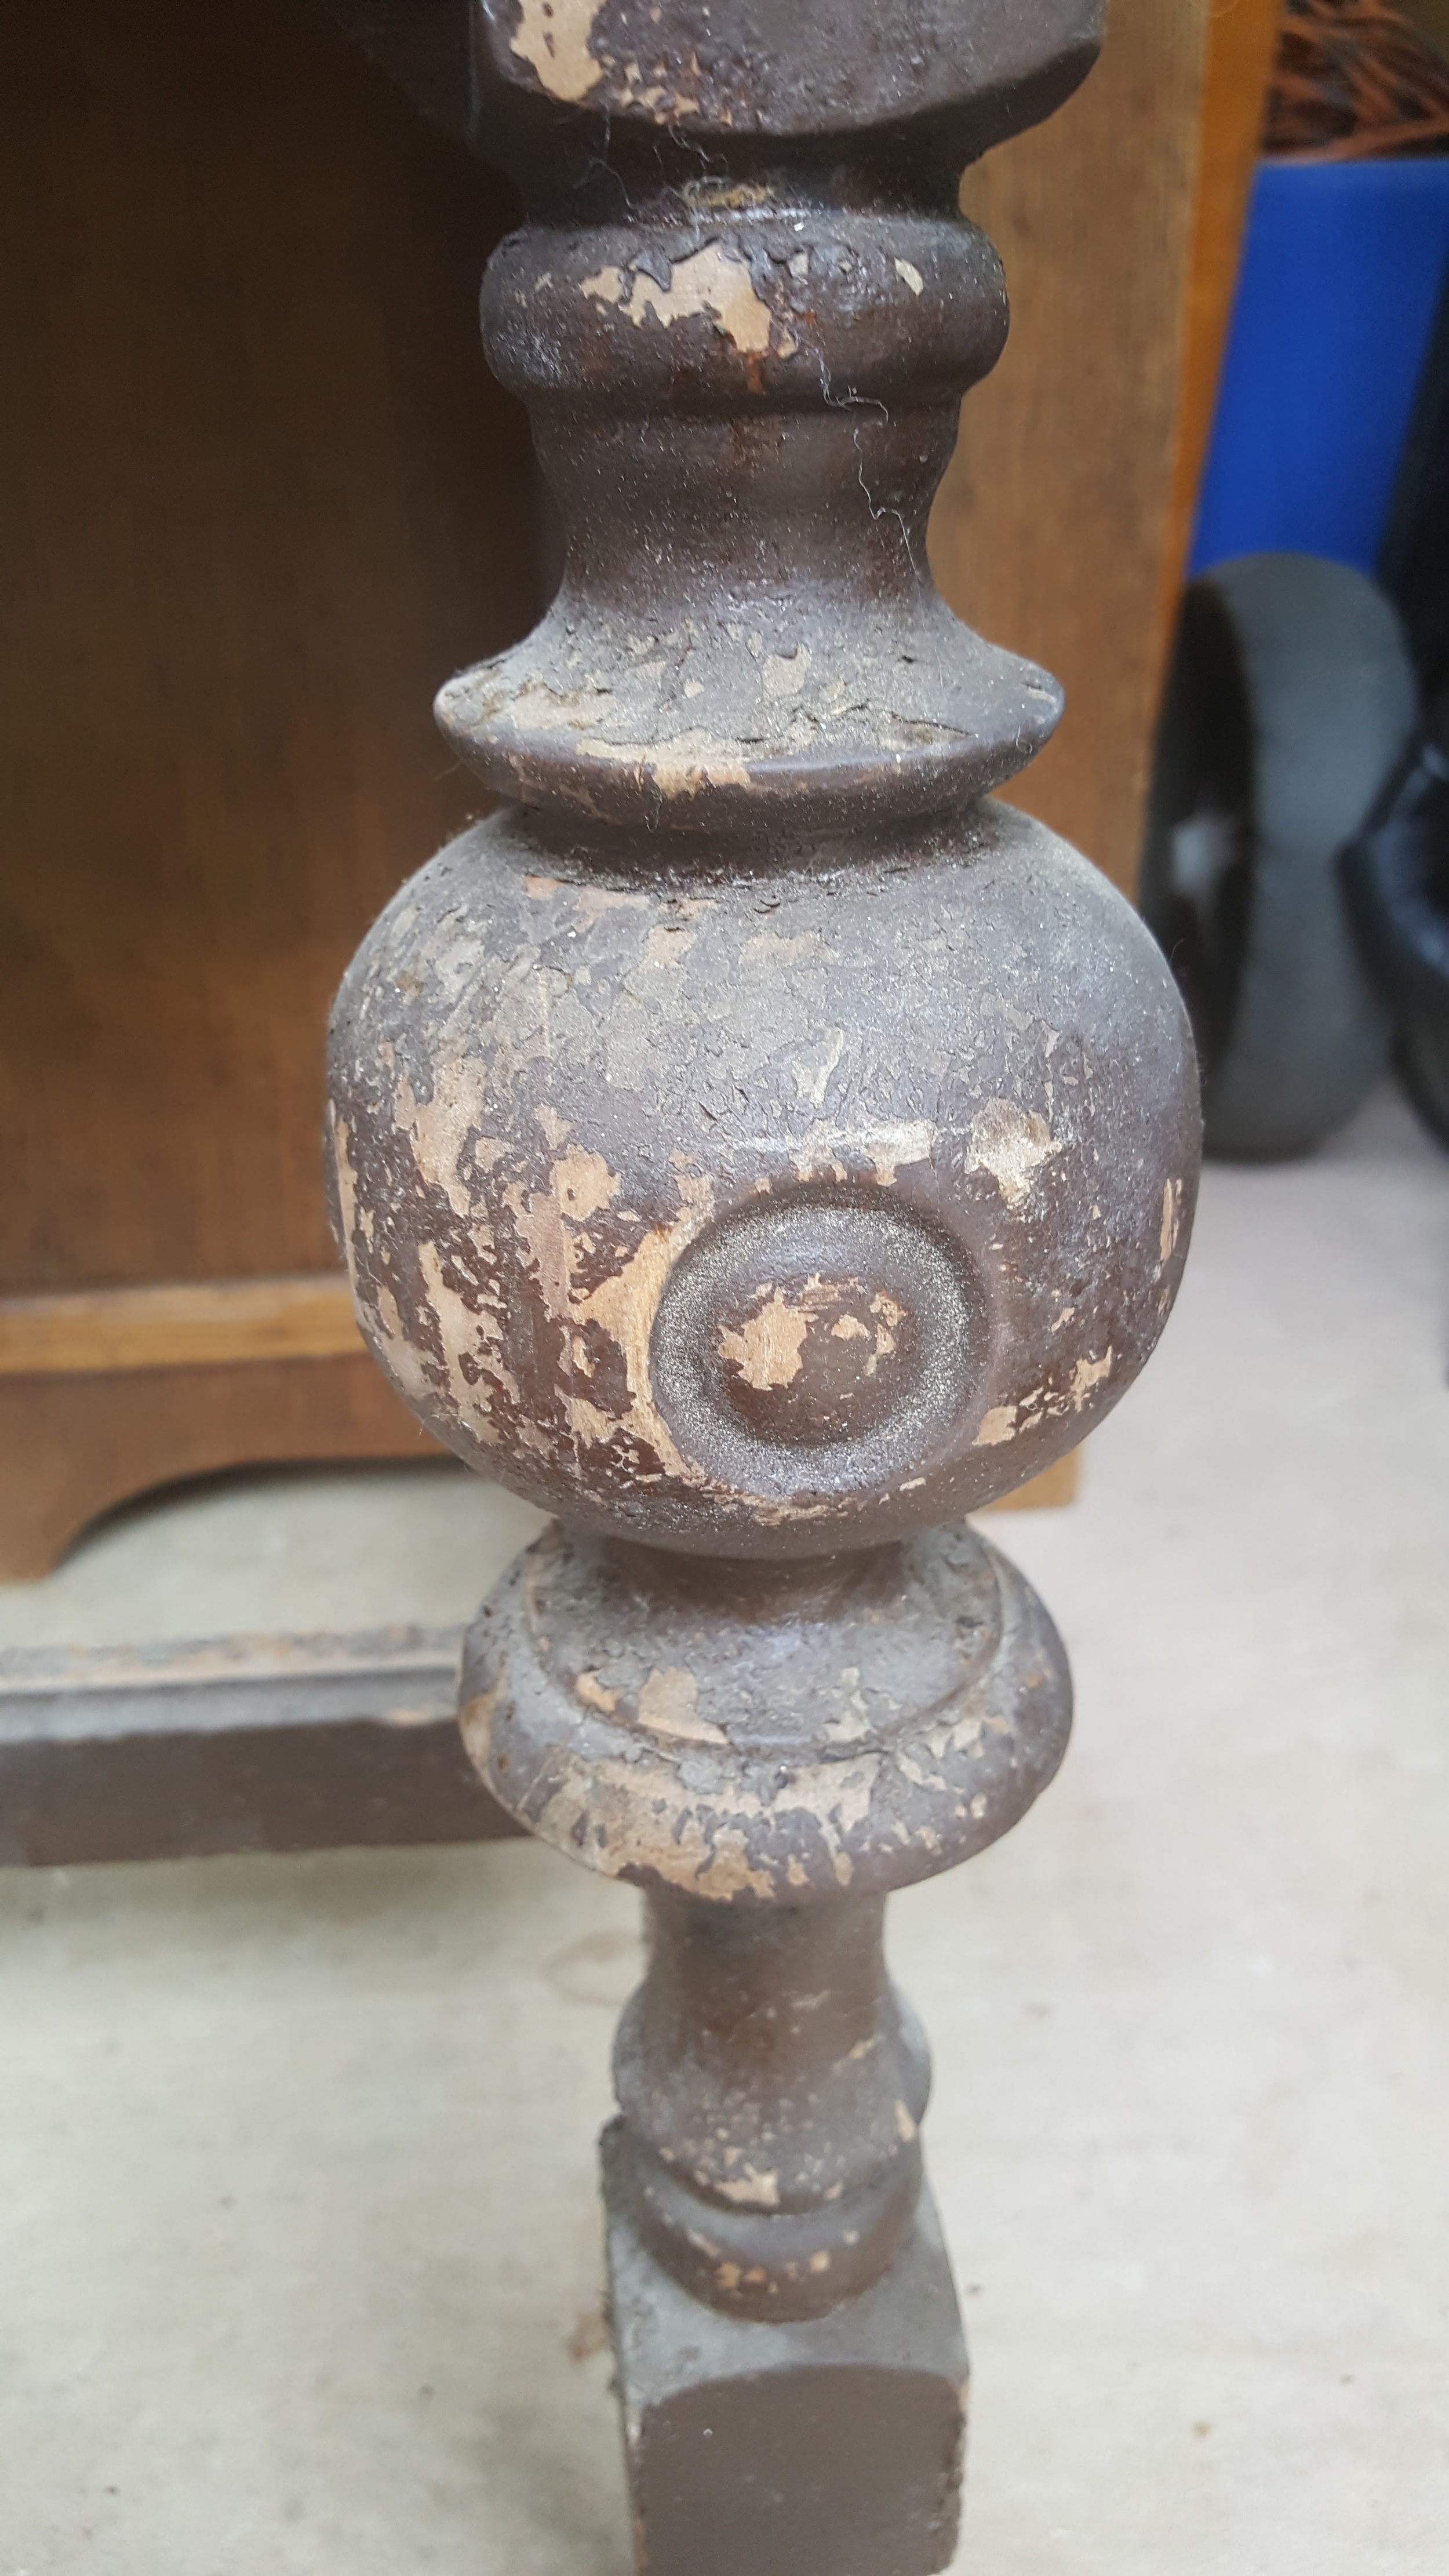
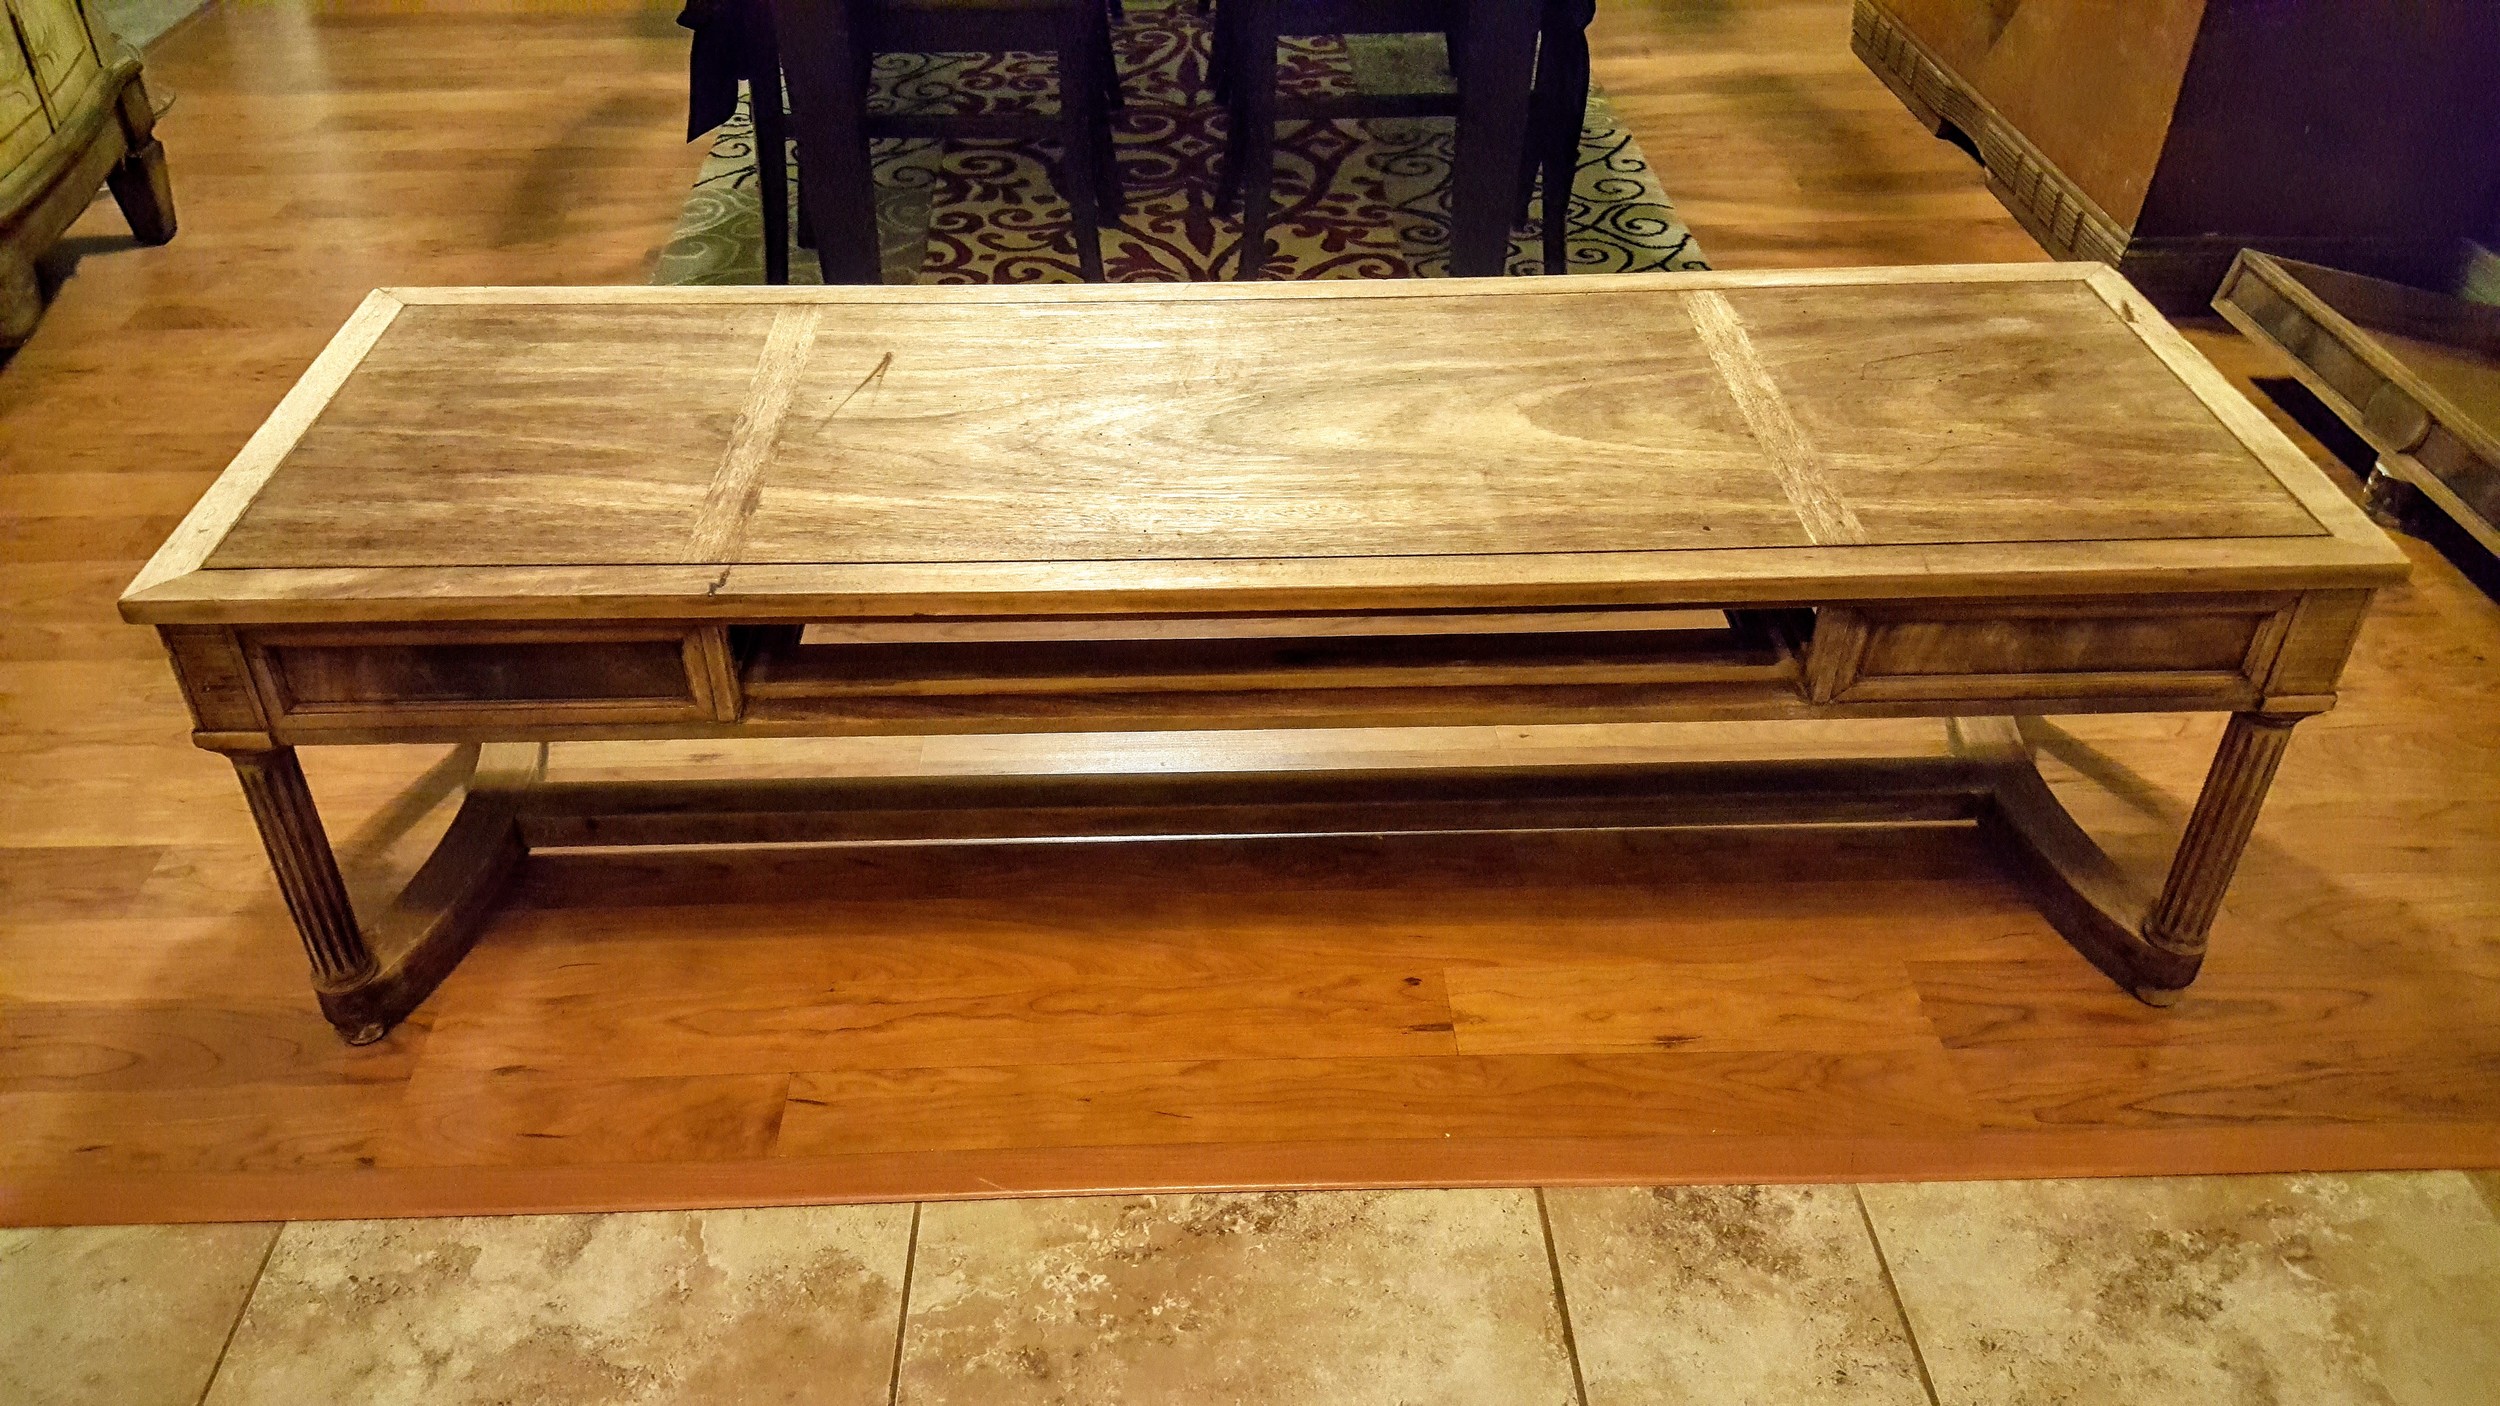
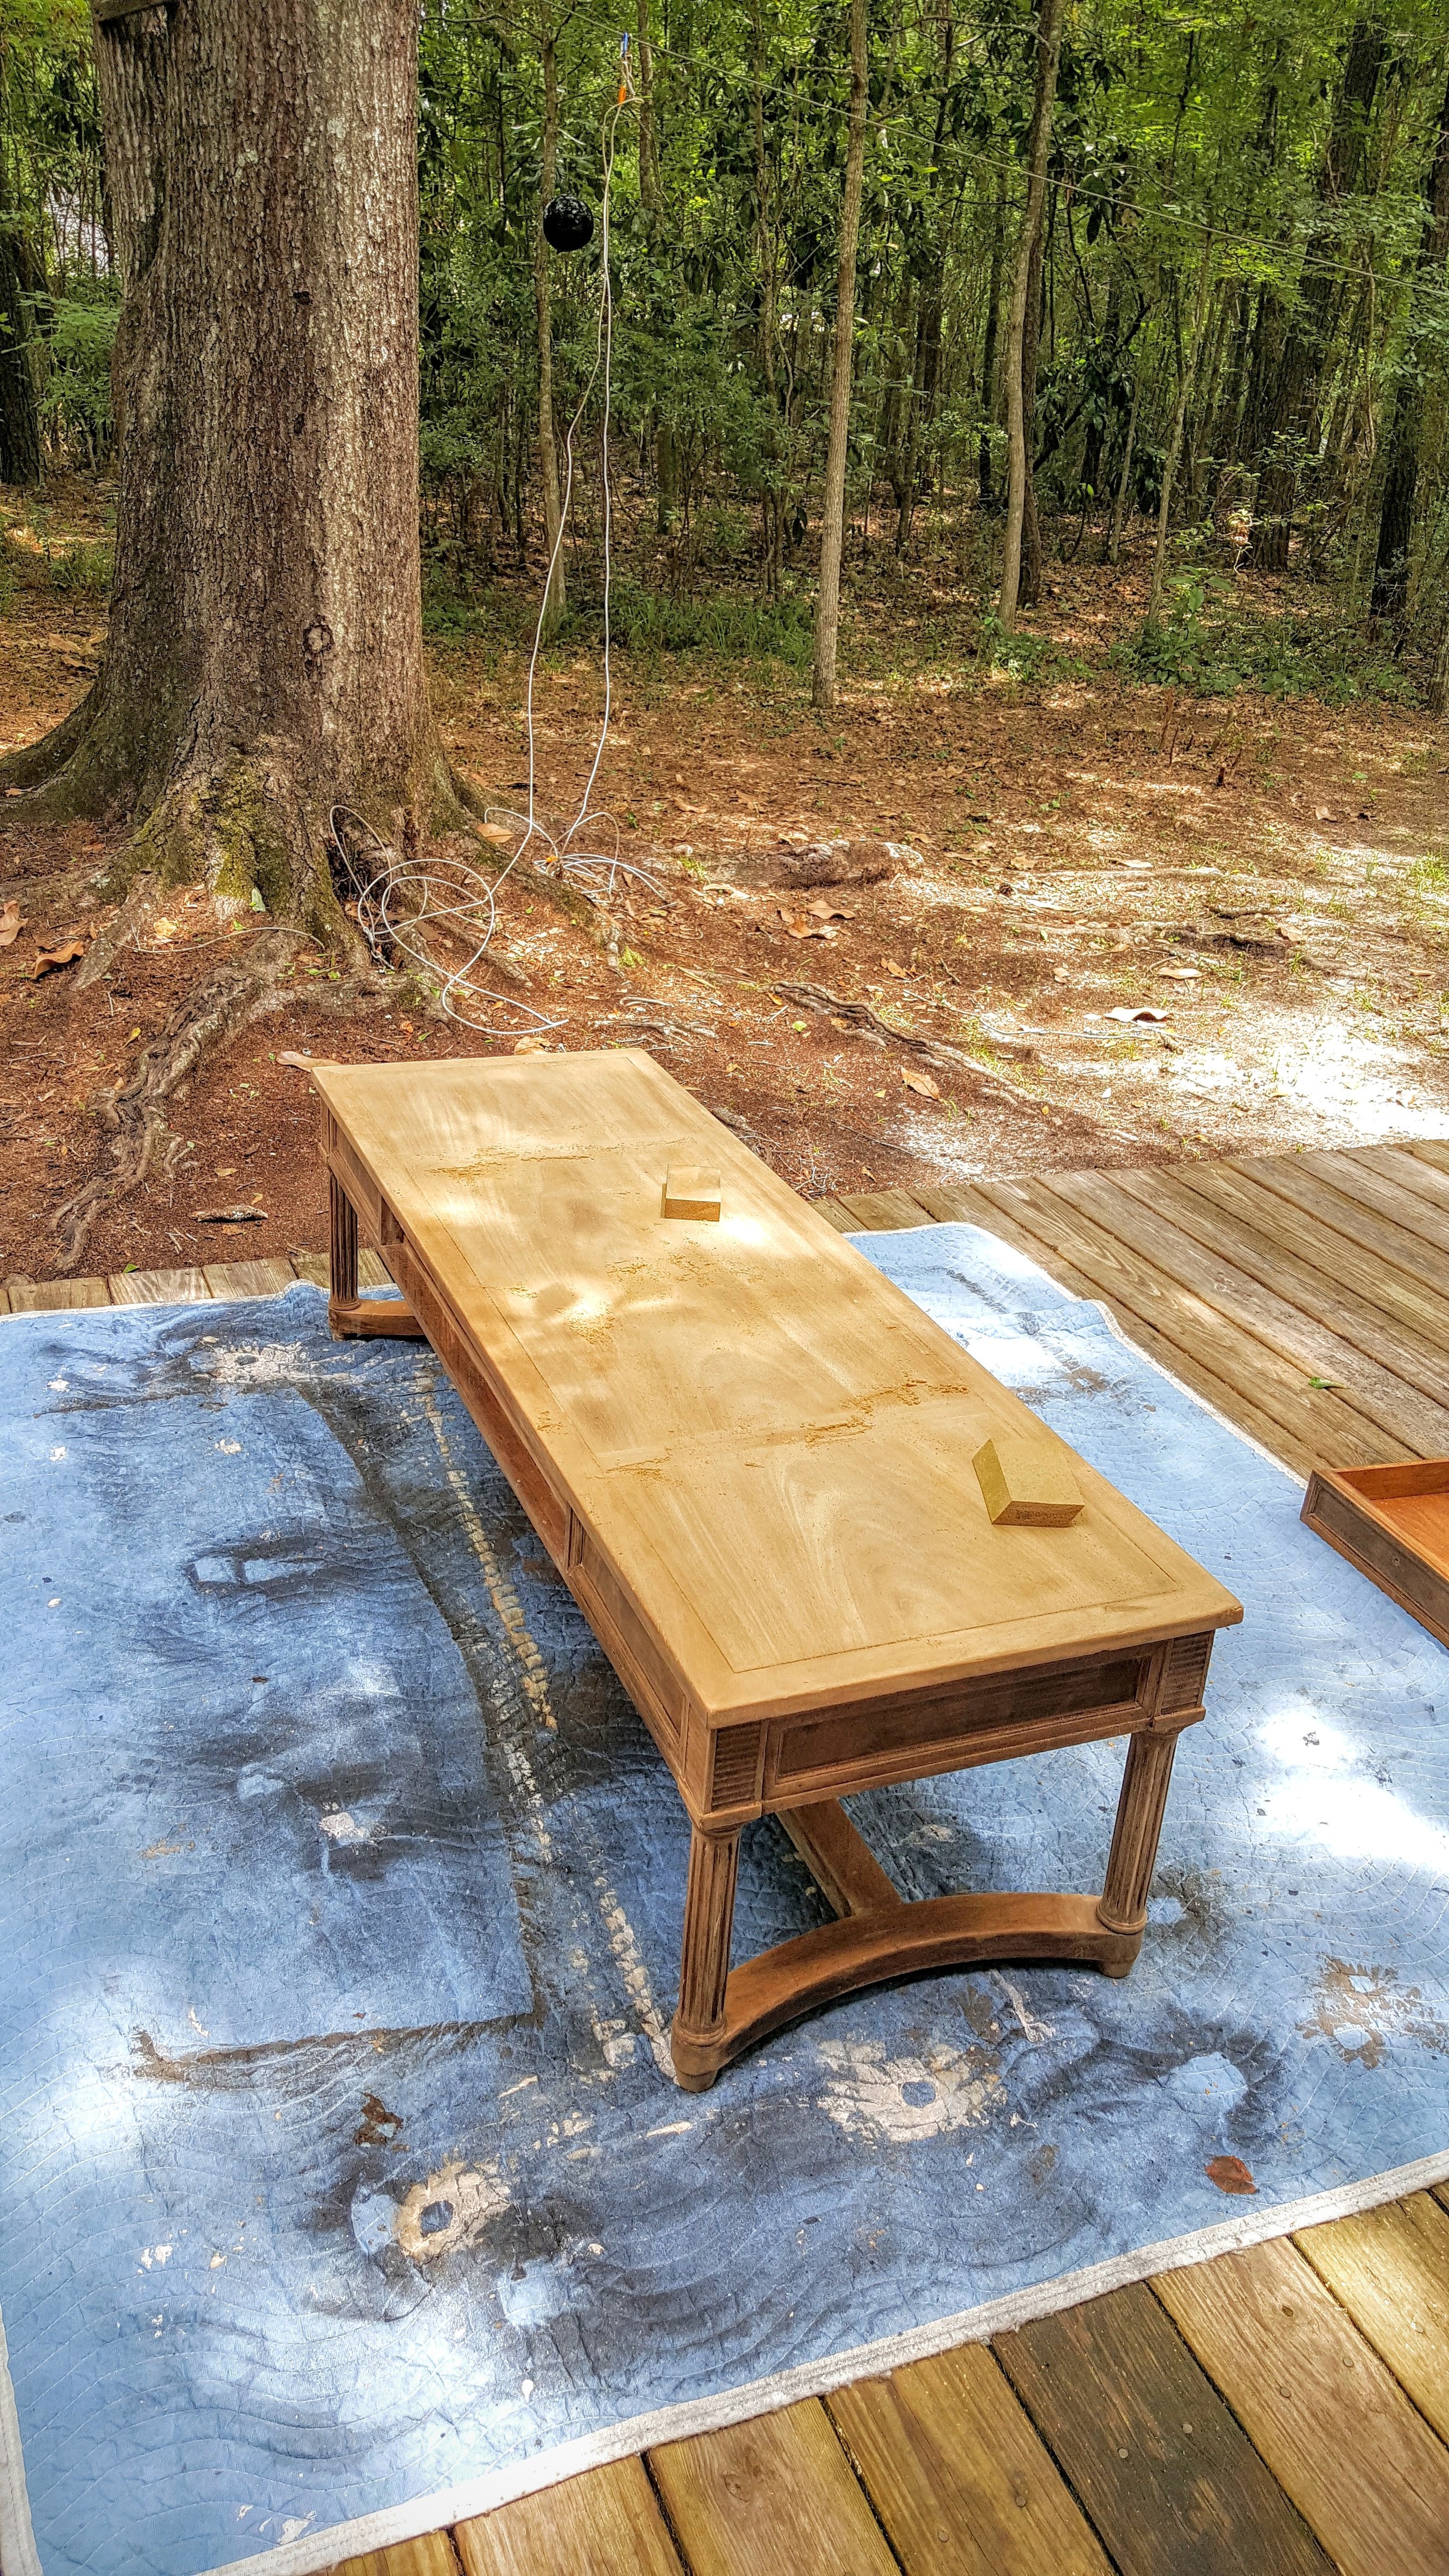
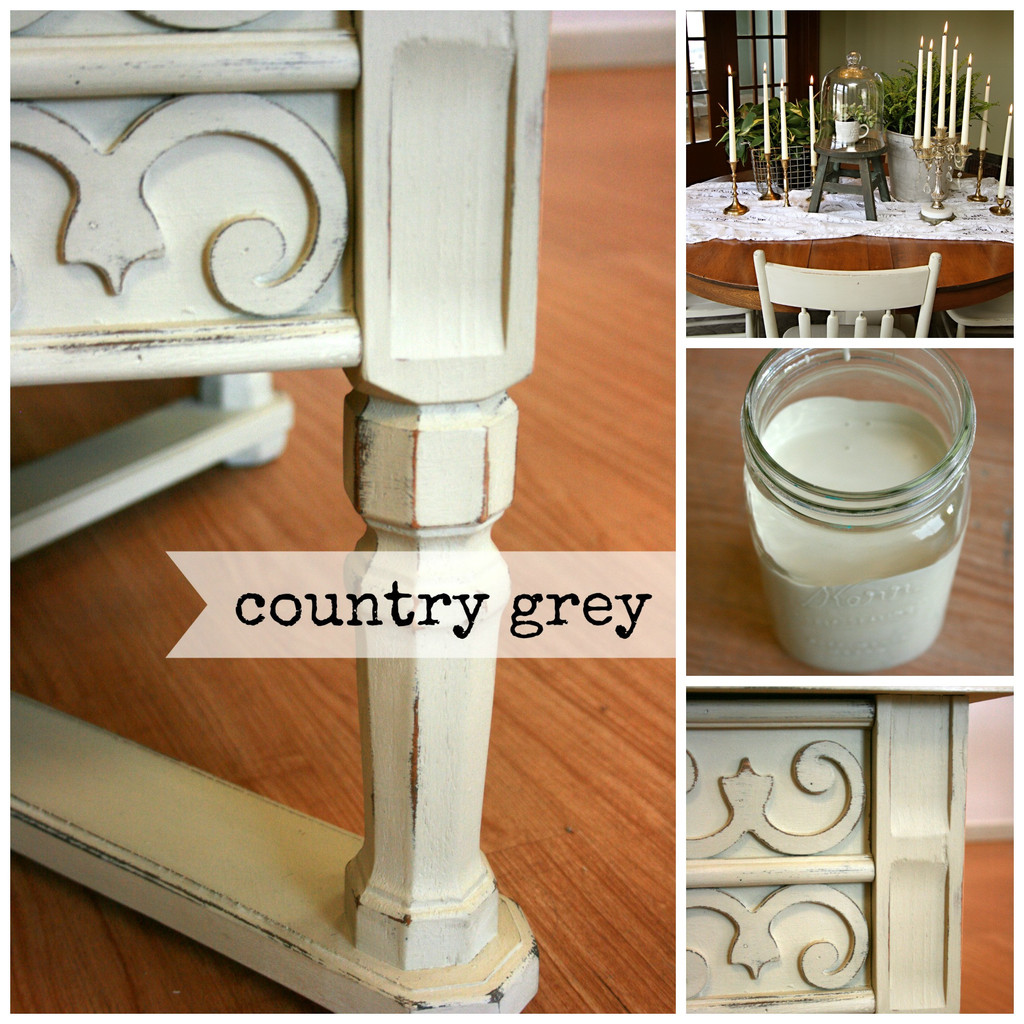
The piece was scratched up like crazy so I removed the hardware on the faux dresser and covered the holes and the lines with wood filler that can be painted.  Then...I sanded the top really well to get as many of the scratches off the top as possible.  

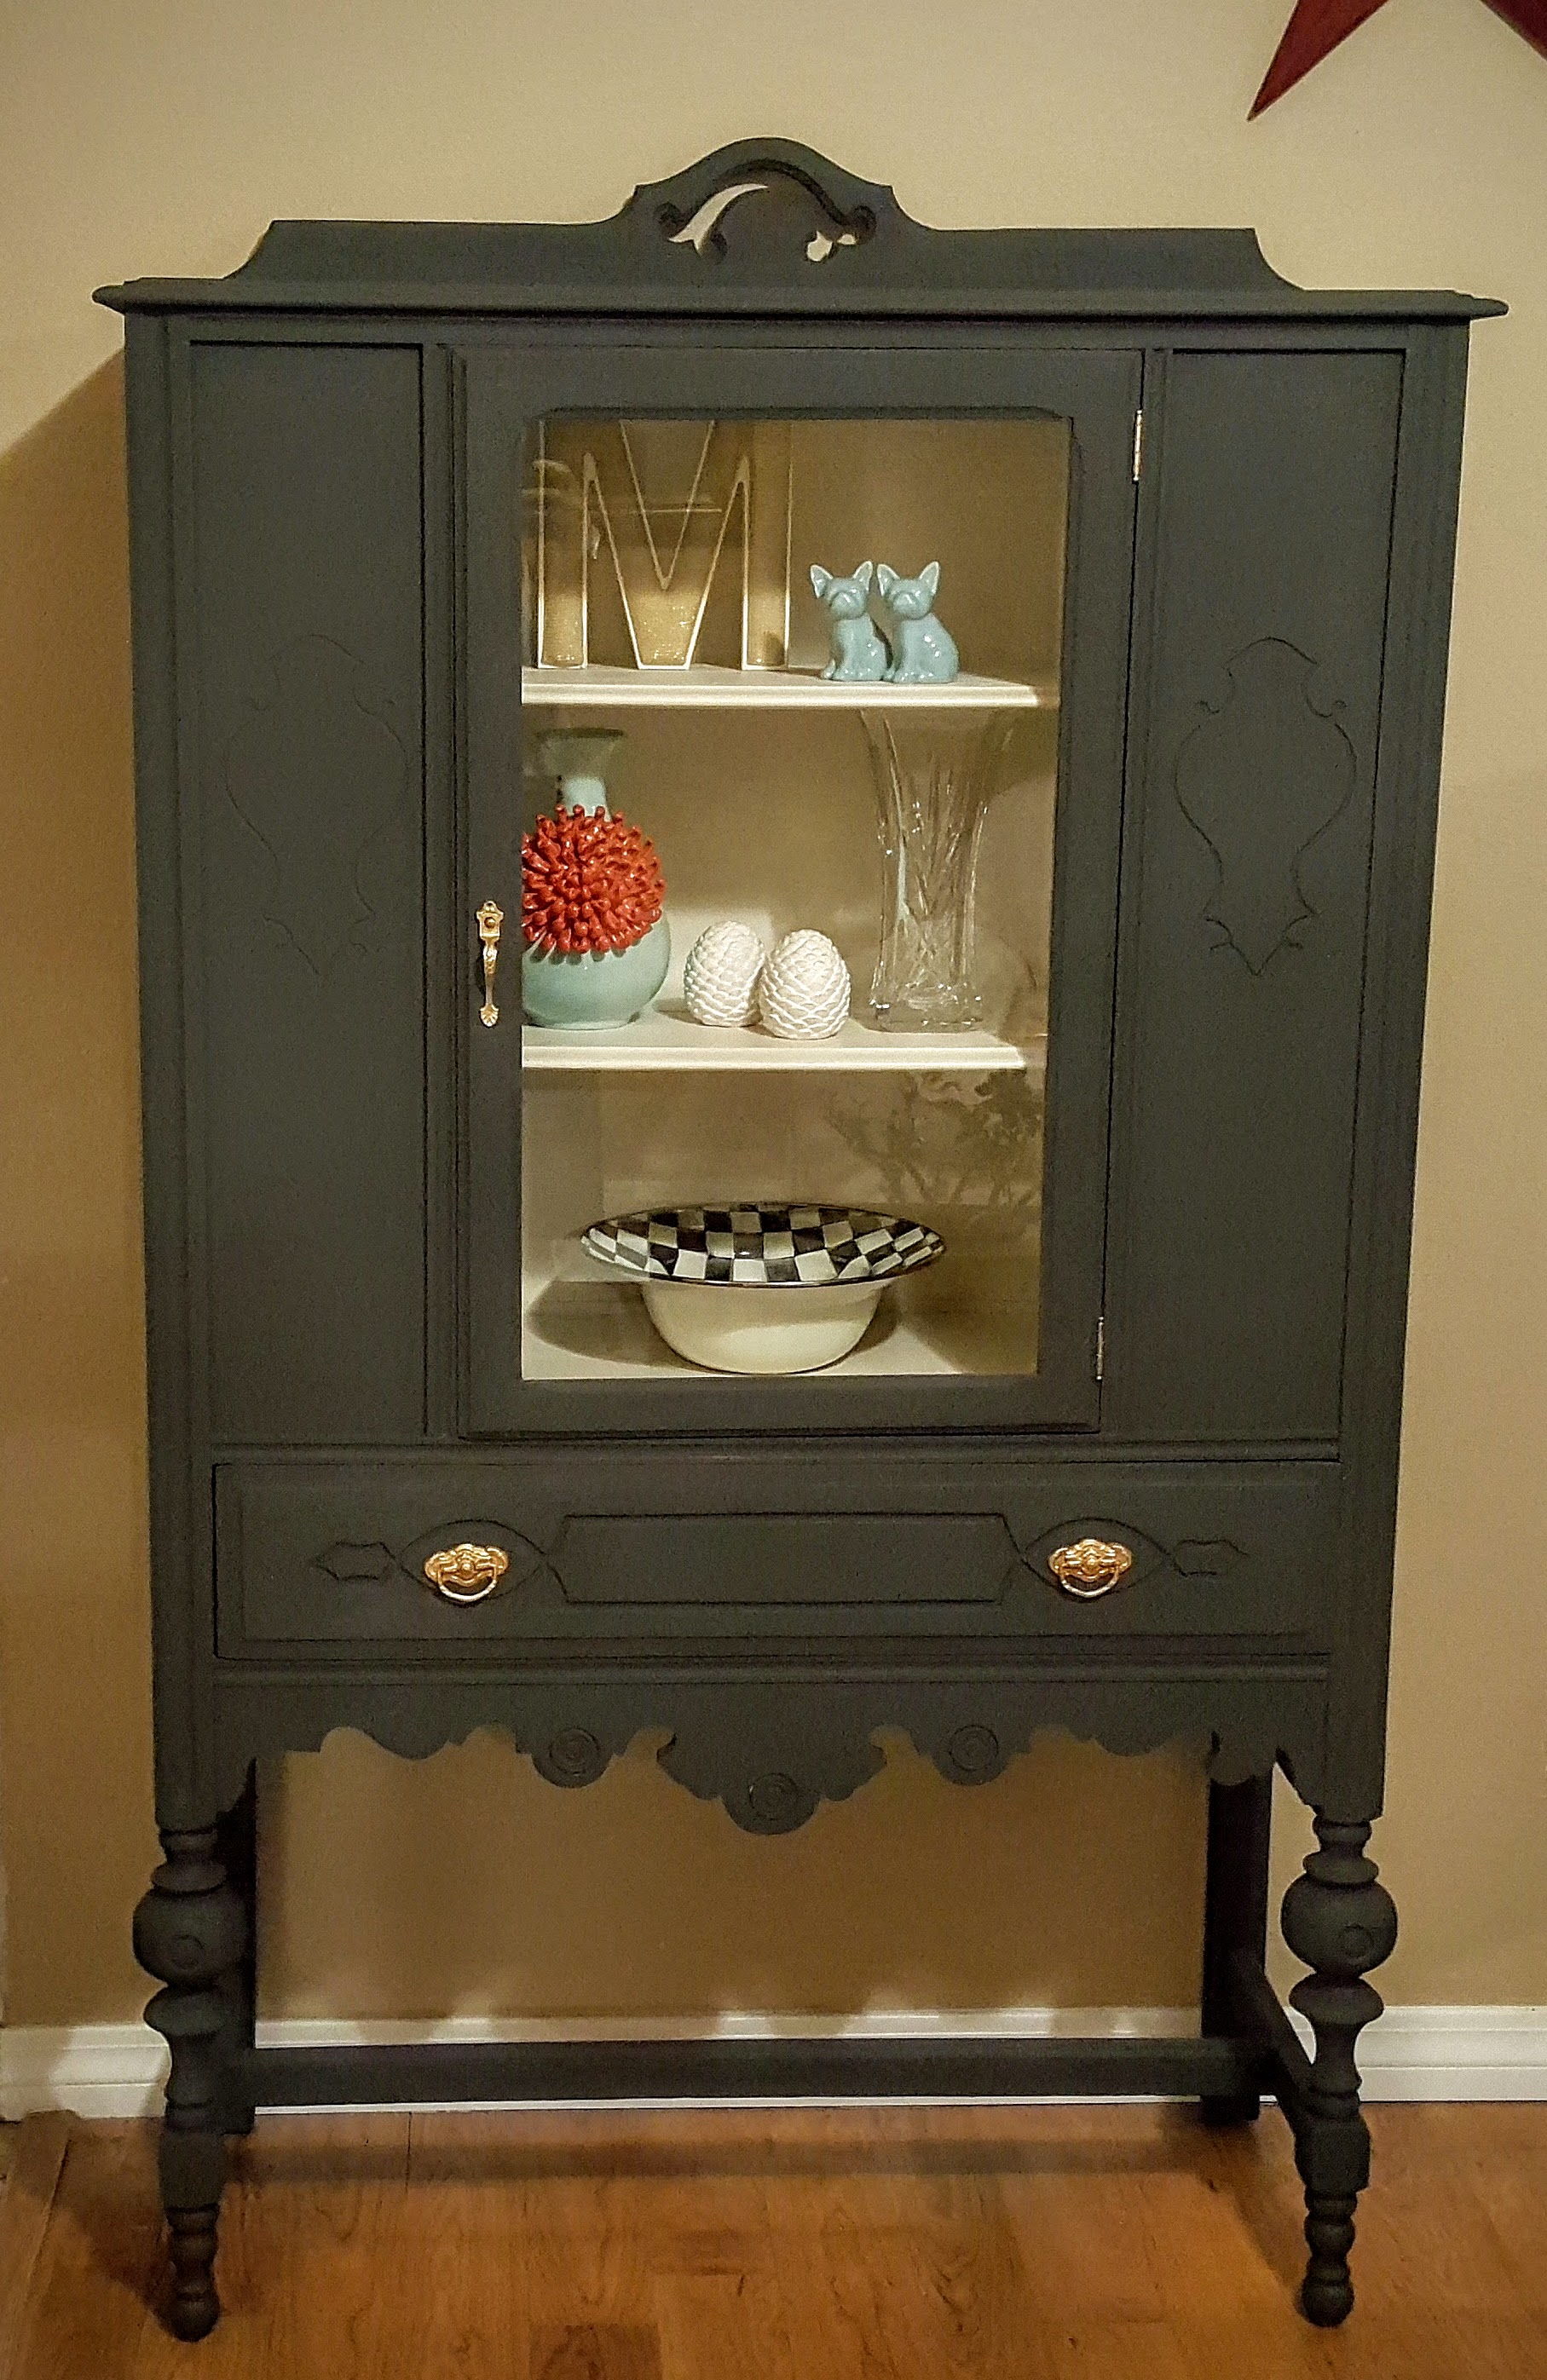
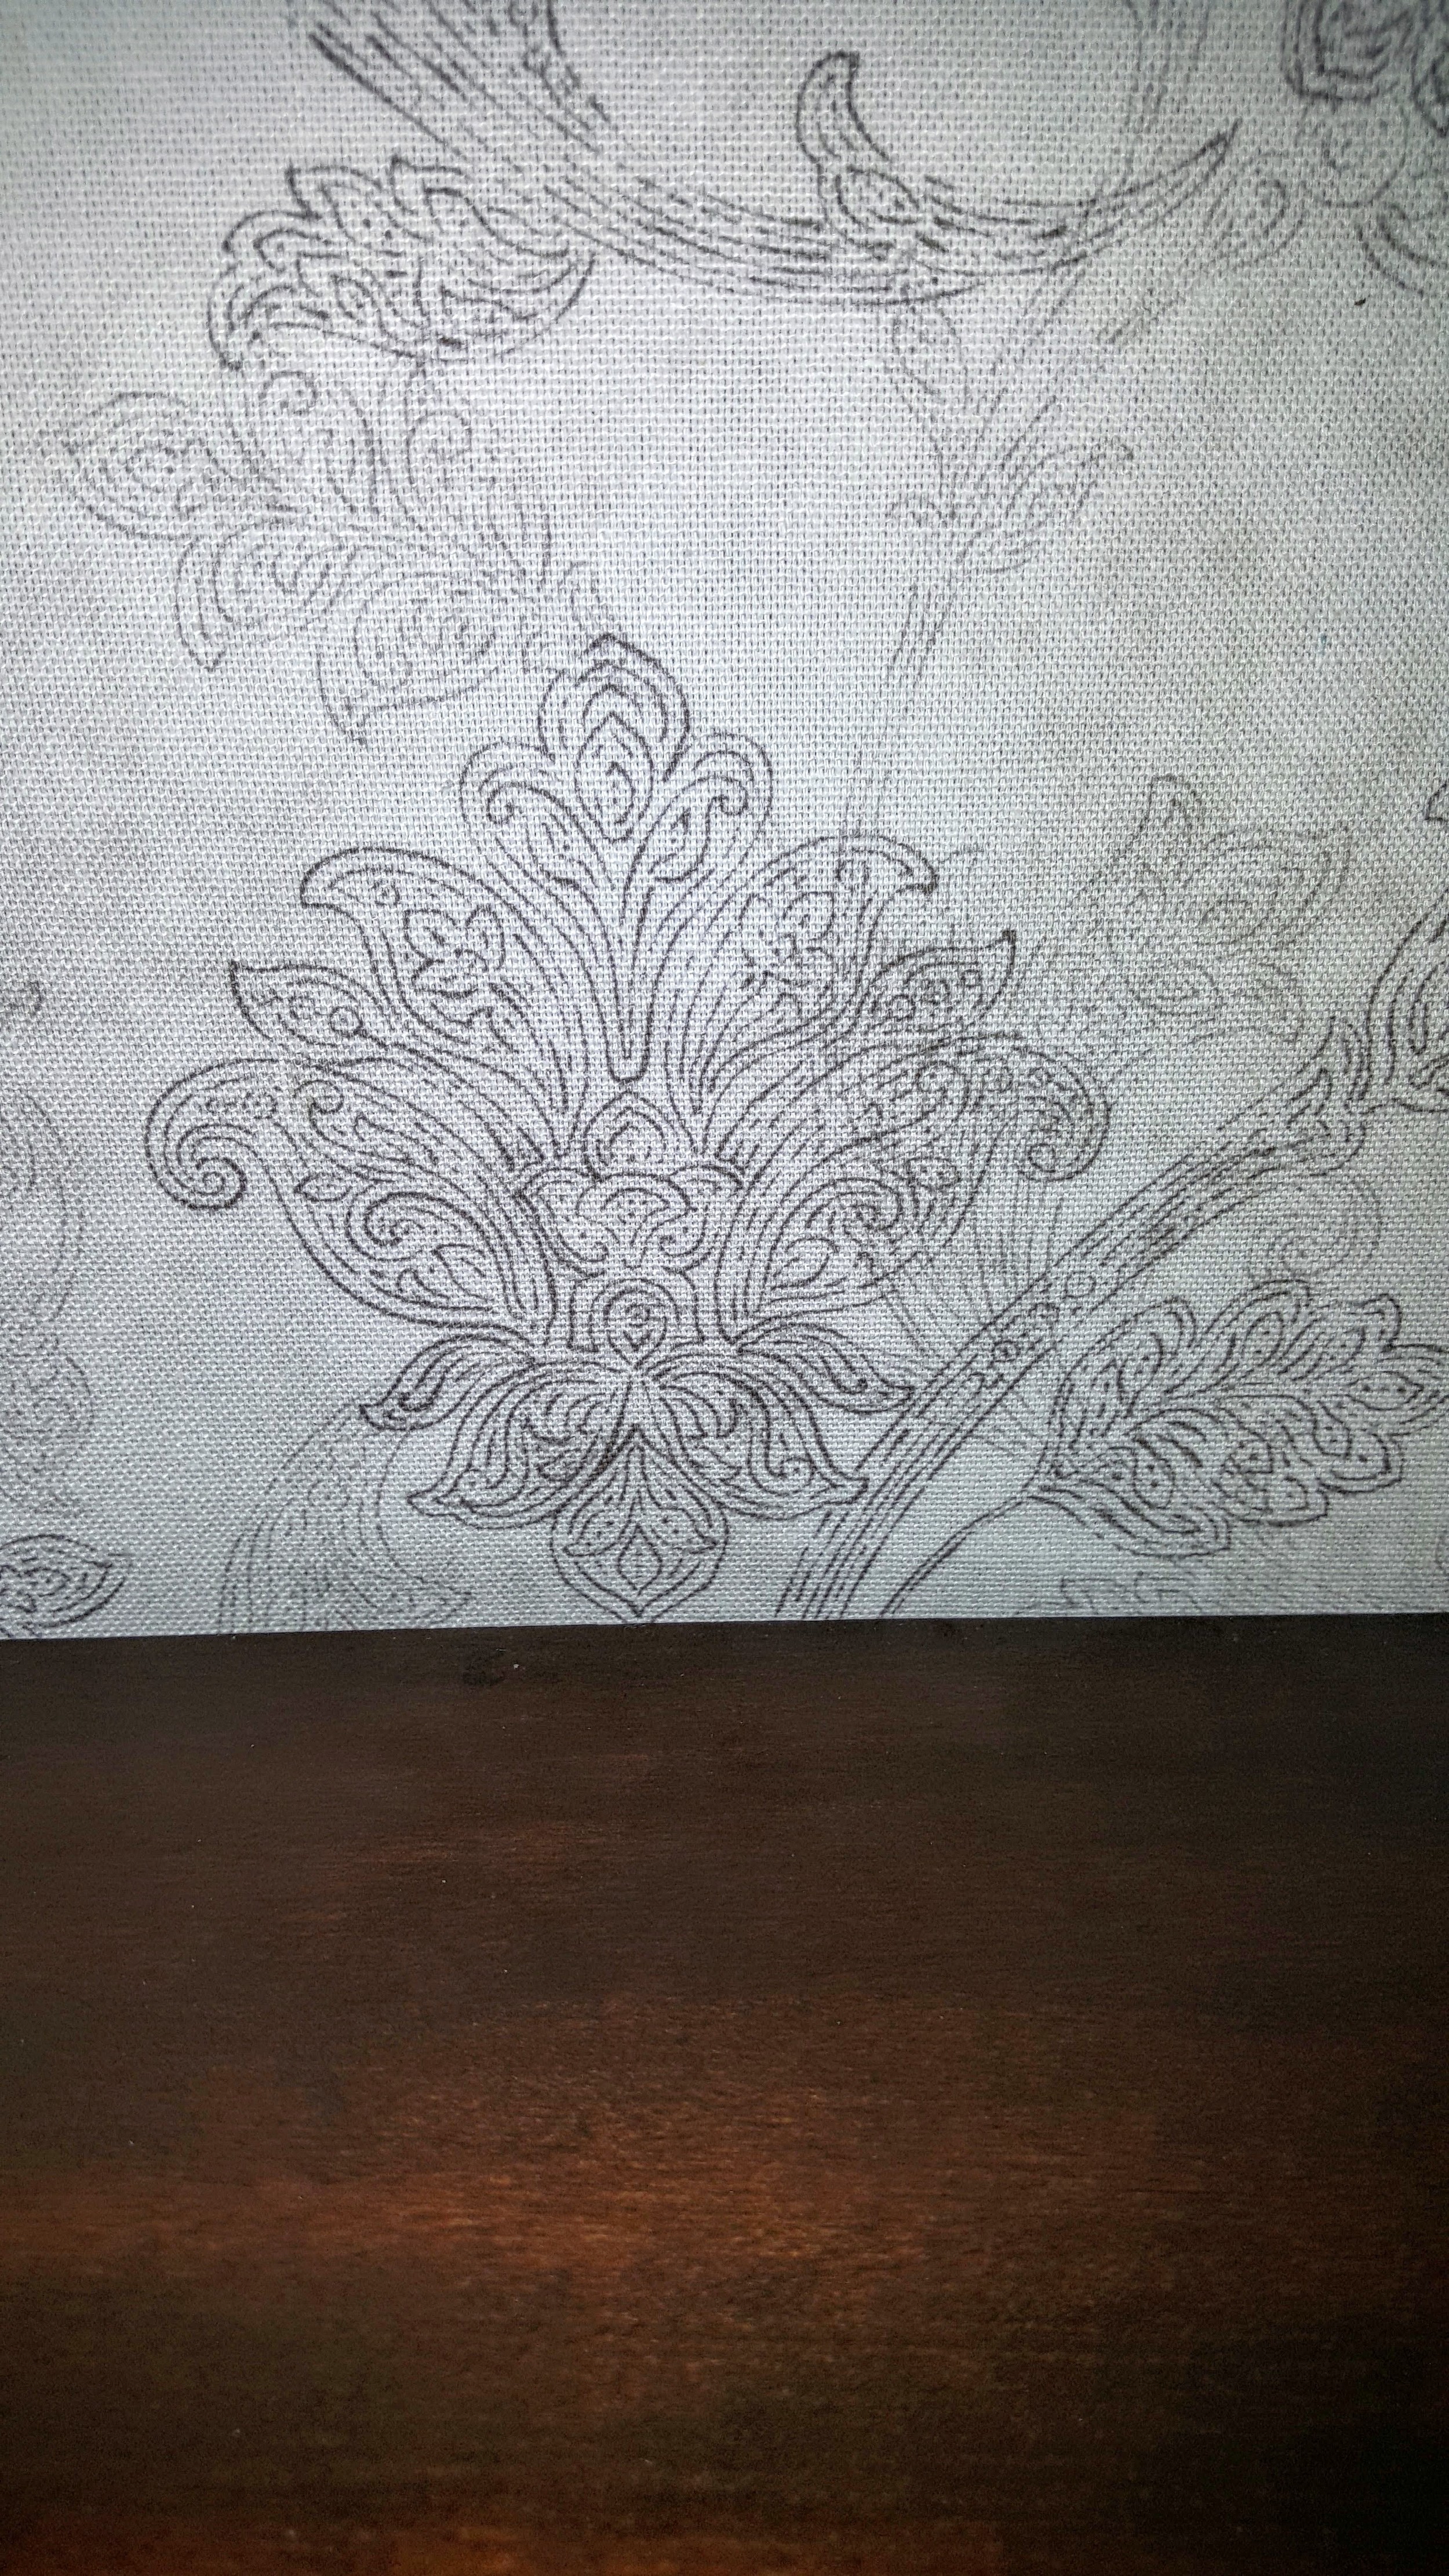
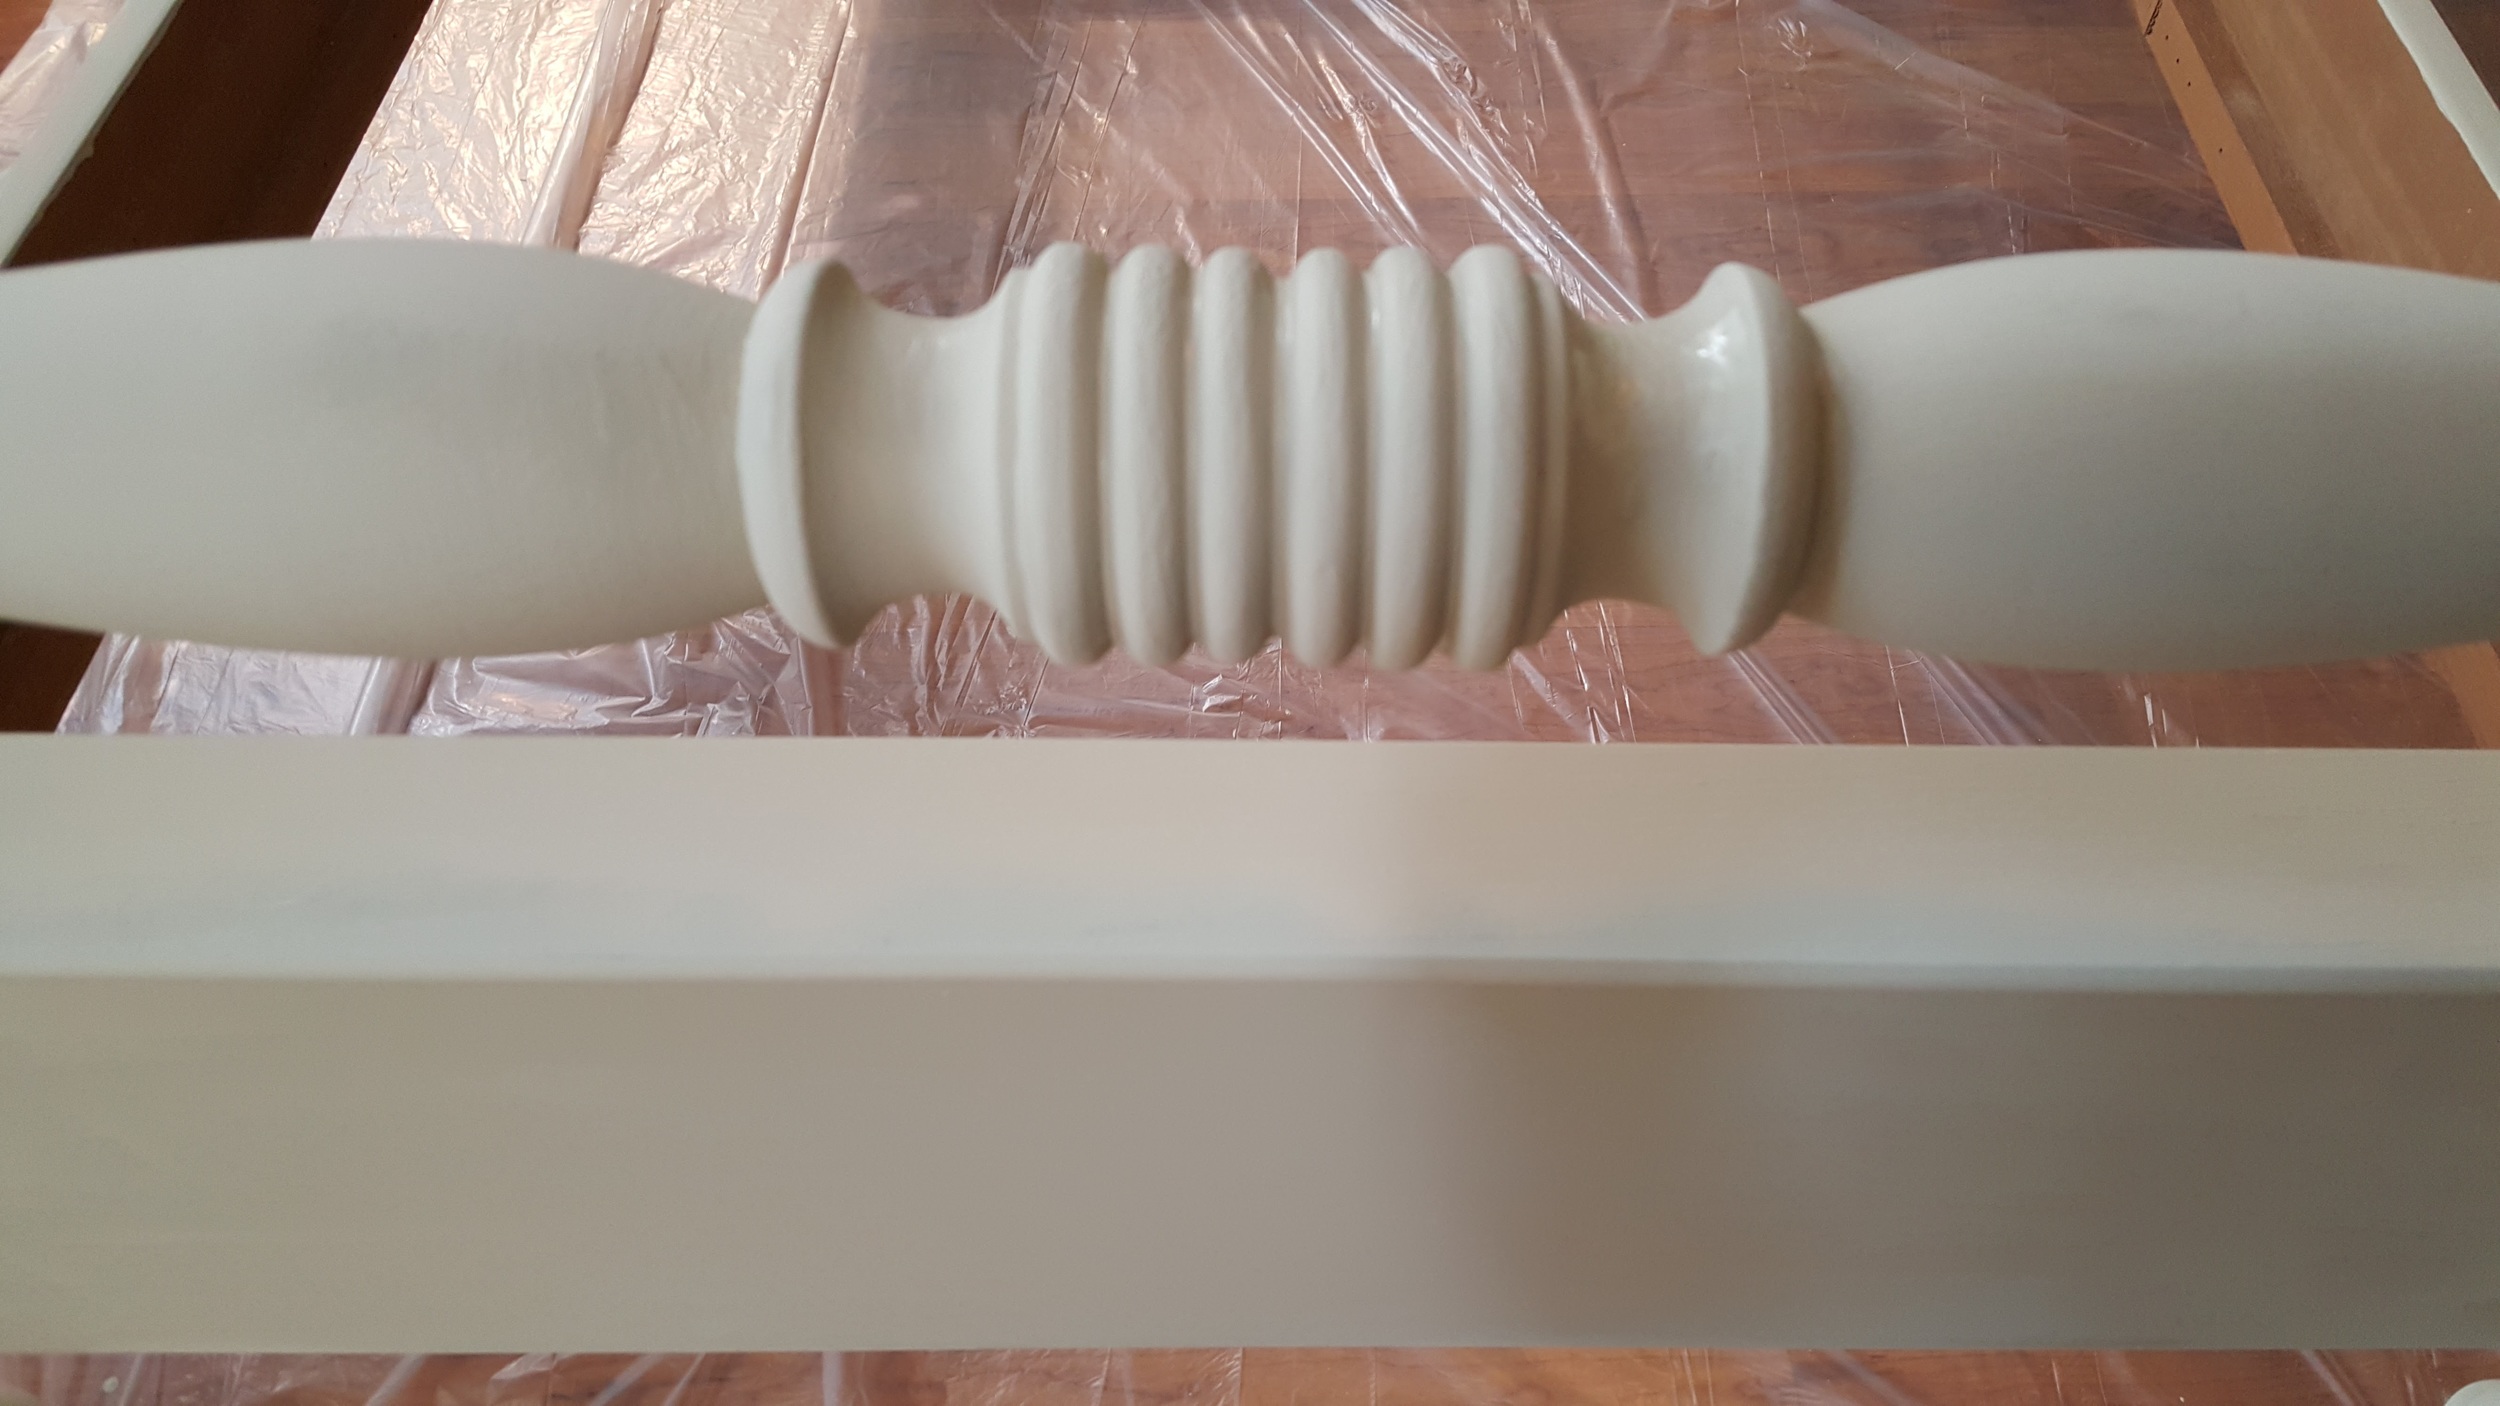
I wanted a "front" so I used contact cement to add a pair of latex appliques to it.  I didn't decide this until I'd already put a coat of paint on it.  Next time, I'll know to make the decision BEFORE I've started.  Will make it a lot easier.  I added a bit of gold Rub N' Buff to the appliques so that they would stand out a bit.  I did the same to the bottom ring on the legs.

I put three coats of General Finishes High Performance top coat on the top to make it virtually indestructible and a dark wax along the base and legs for more of a shiny patina.  

I paid $5 for this table so yeah...even if one of the nephews Hulk smashes another one on top of it...I'm good.  LOL!

Plant Stand Makeover in Annie Sloan Provence and Dark Wax

This was tragic in the beginning. TRA-GIC!

I thought it was going to be a simple job of stripping and then painting but noooooooooooooo!  It had been painted and then covered with contact paper and then?  PAINTED AGAIN!  I didn't get anywhere with an entire can of Citristrip because of the stupid contact paper.  Once I got the top coats of paint off, then I had to pull off the contact paper and THEN I had to strip that paint off.  Seriously...I almost gave up on this thing thinking that a plant stand just really isn't worth all this trouble so I left it alone for a few days and worked on something else.  Then I thought about how gorgeous my trailing begonia would look on it so I stripped it, sanded it and painted it.  Then?  I got jiggy with it and used my stencils to put a few designs on it.  After that, I used 100 grit sandpaper to distress all the edges of the wood and went over it with dark wax.   

And now?  Me happy!  Had I known about all of the layers of paint and the contact paper in the middle?  Yeah...Idda passed.  I never want to do that again.  

Isn't it purdy?

Vintage French Provincial Nightstand in Pink and Berry!

First time I saw this...it was scary.

And now...it's all lovely and ish.  Perfect for a Princess' bedroom.  Isn't it gorg?

Antique China Hutch in Annie Sloan Graphite and French Linen

When I found this piece...it looked tragic.  It was covered in brown paint with faux wood grain contact paper on the shelves.  I bought it because I liked the details and well...I was also looking for a nice piece to use Annie Sloan Graphite on.  It is such a rich color that I figured it could be used to make anything look elegant.

When I got it home...I was curious as to what kind of wood it was made out of so I decided to strip it.  You don't need to strip paint to use Annie Sloan paint mind you...I just wanted to see it in  it's original state.  So I did it...and was shocked to find that the beautiful wood underneath the horrible paint was none other than rare mahogany.

Wow.

I honestly sat there and stared at it for a long time and then I moved around a bit just so I could make SURE I was doing the right thing by painting it.  Then...I decided that hey...no matter what...I could always strip the paint off again if I wanted to right?  RIGHT.

So I took the hardware and door off.  Then I collapsed the shelves and got to painting.  Since it was such a dark piece anyway...I knew I'd have to do a light color inside of it.  The hardware was pretty nice but I wanted it to seriously pop so I used a bit of Antique Gold Rub-N-Buff to make the color really stand out.

I put two coats of paint on it and then let it dry for a full day.  Next, I used General Finishes top coat for protection and now I'm sitting here debating whether I should wax it too.

This piece is so lovely to me that yeah...it might already be SOLD too.  :)

Spray Painted Vintage Temple-Stuart China Cabinet

MATERIALS USED:

Goo Gone Pro-Power

Porter Cable Palm Sander

Sandpaper

Rust-Oleum Comfort Grip Spray Paint Handle

Rust-Oleum 2x Red Primer (3 cans)

Rust-Oleum 2x Colonial Red Gloss Spray Paint (5 cans)

Rust-Oleum Hammered Black Metal Spray Paint (I've used one can for three projects so far on hardware.)

General Finishes Pitch Black Glaze

Minwax Polycrylic Spray

The before and after of this piece makes me super giddy.  I knew I wanted to go with a bold color from jump and I also knew that I wanted it to look smooth like a showroom piece at Ethan Allen so I decided to spray paint it!  

Steps to get a super smooth finish?

1.  Vacuum and wipe down with a bit of dish liquid in a bucket of water.  Don't wet it, mind you...but wipe it clean with a well-wrung towel.  Use Goo Gone to remove anything sticky, hard or icky. Then...let it dry completely. 

2.  Take it apart.  No...seriously...remove all screws, put hardware by type in Ziploc bags so you don't lose them and keep them together so you can get them ready to be painted too if you're using them.  Take the back off carefully using a hammer, pliers and a flat tool.  Either paint or add a piece of fabric using a spray adhesive as I did.  

3.  Use paint cans and spray paint tops to sit pieces on and sand.  Wipe down with damp cloth and then prime after it dries.  (I used a spray primer for red paint.)

4.  One coat of primer on all pieces if you're using the same kind of 2x primer I used.

5.  Let dry COMPLETELY.  I didn't paint until the next day.

6.  Spray paint using the spray paint handle so your finger doesn't get in the way or get tired from depressing that lil' thingy.  You should have a good rhythm and method since you spray painted the primer on.  Hold the can back far enough where you can do light sprays without paint runs.  Just spray evenly and lightly.  Follow the directions and apply your second coat when the can says to.  LOL!  

7.  Remove rust with a rust remover, clean, dry and spray paint hardware.  Let dry completely.

8.  If you're going to add a glaze, as I did, do it the next day after the paint has dried completely and you've corrected any mistakes or paint drips.  (Sand, wipe clean, repaint.) Glaze one section at a time so your glaze doesn't dry on you making it too dark in some areas.  If you love the super shiny, super bright pop of color...don't glaze.  For example...if I were to do a dresser or end table for a little girl's room in a pretty pink or raspberry I wouldn't glaze it.  The color would just be so happy to me as is.  LOL!

9.  Let dry completely and add a coat of polycrylic to any part where you'd sit stuff on like shelves and the top of the bottom piece.  This is just an added layer of protection.  I actually used the spray polyurethane for the first time on this piece and I adore the satin finish it gave.  

10.  Put it back together.  Add the hardware.  Sit back and admire your handiwork with a smug smile knowing that BAAAAAAAAAABY!  YOU DID THAT!

1940s Double Glass Door Bookcase

This piece was seriously rusted and busted when I found it.  Poor thing was all creaky and hadn't been looked after in forever.  Folks are always looking for bookcases and having one with glass doors is pretty cool because you don't have to dust the inside as often as you're used to.  

So...I went to work.

We blew it off with the leaf blower and then wiped it down inside and out with a mild dish soap in a gallon of water making sure to wring the towel out super well so the wood wouldn't be "wet" if you know what I mean. Once it was wiped down I just looked at it for a few days trying to come up with a design for it that kept it as um...stoic as possible.  Just seemed this piece didn't want to be "happy."  LOL!  It's pretty serious about that life.  THUGS RISE UP!

The back of it was pretty busted so I removed it and added a piece of fabric to it using spray adhesive.  Then I took the doors off and soaked the hardware in some rust remover solution.  Next I sanded the whole thing down (did the doors by hand), stained the top, shelves and bottom with Minwax Dark Walnut stain using a brush on the top (it was pretty bad with water rings and whatnot) and a rag inside so I could get all the corners and whatnot pretty well.  

I painted it in Benjamin Moore's Chelsea Gray (love this color) because it coordinated really well with the Waverly fabric I used for the back and followed that with General Finishes Pitch Black glaze wiping it off quickly on the sides but letting it set in a bit longer along the details of the top front and doors.  Once I put it all back together, I finished the top, bottom and shelves with a polyurethane to protect the surfaces.  I kinda like the thought of the painted parts getting a bit more weathered looking.

I like it.  It makes me happy to look at.  And isn't that really all that matters?  That you're happy with what you're doing?  That you're content in the knowledge that you can set your mind to do something and then you can make it happen exactly as you saw it in your head?  And then...what you saw in your head is actually really pretty?  Yeah...I like it.  There is a bit of odd satisfaction in being able to find something unloved and busted and bringing it back to life in such a way it makes a statement.  Just says a lot about so much.  Yup.

Holla.

Upcycled Maple Child's Dresser

This dresser had seen more than a few seriously good years in a child's room if the condition of it was any indication.  LOL!  There were stickers, water glass marks, scuff marks, and anything you can think of that a kid would do to a fine piece of solid maple furniture.  I used Goo Gone to remove the stickers, stripped the top.  Sanded the entire piece, dry wiped drawers interior and exterior (not the fronts) with stain, primed and painted the body and spray painted the hardware.  Final touches included weathering it a bit with sandpaper and two coats of polyurethane as a sealer.

Now?  It's ready for a new child!  LOL!  And since it's such a solid piece, should the new child tear it up...you can always redo again and again and again.  THAT'S why real wood furniture is so expensive these days because you can always make it better.  :)

An Elder gave me a major compliment today.  He's pretty hardcore and thinks everyone is lazy.  Like...everyone.  Always has.  And guess what he hates?  Lazy people.  Today he said to me, "Now see you?  You've never been lazy.  You're always doing something.  So much stuff out there to do and folks just watch tv."

Awwwwwwwww...so much love.  ROFL! I almost teared up.  

Vintage Drexel Triune Coffee Table COMPLETED!

This piece just might be my favorite so far.  Seriously.  The lines and heft of it are just so perfect that it makes me smile. I know every inch of this table as I've stripped it and started over twice because I love it so.   I just had a vision for it you know and I knew I could make it look like exactly what I wanted it to look like.

The brass hardware is original and took 3 separate scrubbing cleanings to get all of the old grime off it with Brasso, 0000 steal wool and using cheesecloth as a polishing cloth.  The scratches on top have been mostly buffed out and the deeper gouges were filled in with stainable wood filler so the top is smooth to the touch.  I love this piece so much, I would want it to have a custom glass top cut to put on top of it for protection.

The finished piece has been stripped with Citri-strip, sanded by hand with a 120 grit sandpaper along the base because of the carved details and sanded using my new Porter Cable electric palm sander (The Robinator is awesome!) on the top.  Then it was stained twice with light sanding in between coats using 220 grit paper and Minwax Red Mahogany stain.  Finally, two protectant coats of Minwax Polyurethane in clear satin were applied (first coat with a good bristle brush, final coat with sponge brush) with a light 220 grit sanding after first coat dried for 24 hours.

I cannot express how completely I love this piece.  The closest online comparison of it that you can currently buy by Drexel is this cocktail table for $1,929 and it's in cherry, not rare mahogany as this one is. Drexel Cocktail Table  

They call them cocktail tables now and that cracks me up.  LOL!  I guess people are more fond of cocktails than coffee these days.  LOL!

This piece already has a home, unfortunately, as someone I love claimed it when they realized I wasn't going to keep it.  They have excellent taste and recognized the quality of it immediately too.  I have been doing a soft discouragement campaign using the techniques of saying nonchalantly, "You know you don't have to buy it. It might not match your stuff now cuz it came out so dark.  Don't feel obligated to follow through just cause you said you were going to." But that hasn't worked.  *sigh*  LOL!

I am having SO.MUCH.FUN doing these pieces I'm finding!  GO ME!!!!!!!!!!!!! GOTTA KEEP BUSY! Isn't it gorgeous???????

Drexel Triune Coffee Table

So...I ran into this piece and recognized that it was solid, CARVED, real wood.  It was heavy and seriously...there are no screws.  LOL!  Like...it seems to have been put together by elves.  So I scooped it up.

Then, I got it home and did some research on it.  When I found out it was solid mahogany, I was like...WHOA.  See...mahogany is super rare now.  Something about them using it all up and not replenishing it properly.  That's why it is so expensive when you find it.  So then...I got scared.  REAL.SCARED.

I didn't want to screw it up.

So I read everything there was about refinishing real mahogany because there was no way in hell I was putting paint on real mahogany.

First...I stripped it with Citri-strip.  Then...I let it dry for almost a whole week.  Next, I sanded it and then...I tried to repair some of the deeper scratches.  Right now I've put one coat of stain on it and I'm letting it dry completely.    I'll pick back up tomorrow with another sanding to fix the scratches even more.

This one is a slow and steady job so it might take a while to complete it.  I'll let you know when it's done.  I'm just super happy about the find.  Real wood is expensive as all get out.  Real MAHOGANY?  YAAAAAAAAAAASSSSSSSSS!!!!!!!!!


Vintage Mersman Round Coffee Table

Mersman 31-25

Mersman 31-25

I was looking for something I could try the shabby chic look on and glaze.  Since I only paid $5 for this piece, I wasn't scared I'd screw it up. LOL! And hey...even if I did screw it up, I could always strip it and start over right?  Right!

One of the things I really enjoy is doing the research on a piece and finding out who made it and when. I always get excited when a piece has the manufacturer's name on it.  

This table is from the 1950's and has a nice bit of solid heft to it. In the 1950's, laminate furniture was popular and this piece had a laminate top.  Because of this, I sanded it and primed the entire table before painting. Then, I distressed the base with sandpaper and put on a coat of polyurethane.  Next I used General Finishes glaze in black on the top and the shelf to give them a distressed look too.  I haven't decided if I want to glaze it again or not but once I do, I will do another coat of polyurethane after a super light sanding.

upload.jpg

Whatcha think?  This is my first attempt at distressing with sandpaper and glaze.

English Yellow Annie Sloan Chalk Paint Empire Chest

Annie Sloan English Yellow Chalk Paint - Two coats.

Annie Sloan Clear Wax - One coat.

Minwax Dark Walnut Stain - One coat on stripped and fully dry top.  

Minwax Polycrylic Protective Finish - One coat on fully dry top.

Brasso - Rubbed brass brad finishes until they were shiny.  

The interior drawers are pretty perfect but I might paint them a shiny black.  Eventually.  Maybe.  Maybe not.  LOL!  I like it.  It makes me happy.  LIke...really happy.  Although, I'm sitting here looking at it now thinking that a stencil of white cherry blossom branches across the three long drawers starting about a third of the width in would be super cute.

Hmmmmmmmm...

Have you refinished a piece yet?  Or a new piece if you've done it before?

Do you like the yellow?  


Make A Planter Out of Any Vessel!

I love it when I'm surrounded by flowers and plants that smell good.  I also love it when they are in really cute planters and I've learned that any vessel can be turned into a planter.

Take this watering can I bought at Target from the dollar bin section for $3:

I didn't put holes in the bottom of it because the plant doesn't touch the bottom so chances of it sitting in water are slim to none.  

I bought this one for $5 and choose to put holes in it so I could actually plant the flowers in it.  The flowers cost $3.99 and will provide color for a while.

I did the same to this one that I paid $13.99 for at Ross.  I put about $14 of flowers in it and VOILA!  Fabulousness!

So...no matter what you have, you can turn it into something fun and fabulous to surround your outdoor living space with beautiful flowers!  I've seen people use old tires, wheelbarrows, tin buckets, etc.  As long as you have some drainage you should be good!

Billy Balls and Blue Thistle...Quick and Easy Arrangement!

When I can find billy balls and thistle, I make 4 of these little arrangements to put throughout the house for a pop of color that lasts and lasts and lasts.  I'm talking a solid month or more if you remember to not let the water get icky.

I love to put them in the guest bedroom and bathroom and then...forget about them.  LOL!  I love the personal touch that flowers on the nightstand adds to the welcome level your guests should feel and this is super cute with a nice little pop of color.  Wrap a bit of kitchen twine around the neck and VOILA!  You're doing big things with minimal effort.

Stripping Paint with Citristrip! #Citristrip #DIY

I'm working on upcycling a new piece.  It's a fabulous chest.  I wanted to stain the top instead of painting it and started by sanding it.  Well...I got worried because I didn't want all of the wood's natural imperfections to be removed via sanding so I decided I'd strip it instead using Citristrip

It was my first time using it and it was relatively easy.  The most difficult part was letting it sit for 30 minutes.

So...using a paintbrush, I brushed it on the top pretty liberally.  After 30 minutes, I scraped off the gunk using my painter's tool which is seriously the best thing ever for doing so much by way of DIY.  Red Devil's Painter's Tool.

And then voila!  It was ready to stain.  I used a stiff bristle brush to get the scraped bits in the grooves and, since I was in the sun...it dried relatively quickly.  

This was seriously the easiest thing ever.  Stripping paint is tedious and generally icky.  This was easy and with a pleasant smell to boot.  GO ME!  LOL!

New #AnnieSloanChalkPaint Project!!!!!!! Empire Chest!

I have a wish list of things I've always wanted.  On this list?  Rolltop desk, highboy, dining table which seats 12+ and...DRUMROLL PLEASE!!!!!  An Empire Chest!

Give me a minute while I hit a cabbage patch move right quick!  GO ME!  IT'S MY BIRTHDAY!!!!!

I found an Empire Chest and I couldn't be more ecstatic.  It is in pristine condition.  Early 1900's. HEAVY.AS.HELL!!!!!  Clearly on days when my favorite consignment store lady calls...I need to rent a man and a Uhaul cuz I couldn't even move that sucker 3 inches.  IT.IS.SOLID!  It is so perfect I don't have to do a thing to it but well...there is this color that I adore and this piece is SCREAMING for it.  The color you ask?  ENGLISH YELLOW.  With a shiny black top (I think.  Might just keep the top as is but I just think black would be sooooooooo sleek.).

I know you can't "see" it but it's gonna be gorg.  I just know it.  You're going to have to trust me here.  LOL!  Oh...and I'm going to have a piece of beveled glass cut to put on the top because I'm thinking it will house a "bar" in my upcoming Monnie Retreat.  LOL!  Okay...okay...so it's a living/sitting room.  No television.  No electronics.  It will be for reading and relaxing.  It will be shiny and gorgeous with a white sofa and FABULOUS window treatments. with super fluffy blankies and lots o' lots of BOOKS!  Yup.  There will be a covered box at the entrance for your cellphone.  NO ELECTRONICS!  It will be a thing of beauty.  (In my mind so far mind you!  LOL!

Okay...so...the way my ADHD is set up, Robby will only let me get one piece at a time so that I don't have a lot of projects stacked up because I've gotten bored.  Cuz we all know that can happen.  In the words of one of the besties:

"Is there ANYTHING you can't do?????"

Answer?  Yes...stick with anything for a lifetime.  Hey...I get bored.

HAPPY WEEKEND!  How is your weekend stacking up?  What's the temp out by you?  It was almost 80 degrees here today.  Throwed the hell off.

China Cabinet Upcycle - COMPLETE - #AnnieSloanChalkPaint

To start...I had to take off that old school gold leaf stuff.  I added about 20 drops of tea tree oil to some hot water, saturated a washcloth with it and then rubbed it all over the gold stuff squeezing as I went so there was water left sitting on top.  Then...I let it sit for about five minutes and, using the blade from a utility knife...scraped it off.  Easy.  SUPER easy.

Next, I painted the interior with two coats of Country Grey (followed by clear wax) and the exterior with two coats of Coco.  Since I was looking to coordinate with a painted chest we already have...I was trying to get a certain color so I followed the exterior with dark wax.

I plan on stenciling the interior back but probably not before Christmas.  I put some stuff in it to take a picture because I didn't want to pull out my china.  Then...I was like...well...I like my china where I keep my china (in the painted cabinet) and I feel like it's safer in there.  Now...safer from what I don't know.  This is how my brain works.  I have issues and I'm not working on them.

Still.

Before.  During. After.  

I like it.  It makes me happy.

And truly...that's all I want in life.  To do whatever makes me happy.

GO ME!

Sooooooooooo...have you decided to try a piece yet?  I'm thinking of painting our family room coffee table.  You know...since a little super cute puppy yall know teethed on it when we first got her.  LOL!

China Cabinet Upcycle - STEP 1 - #AnnieSloanChalkPaint

Whew...I just used a blanket to drag that thing out to the foyer because it has the best light in the house.  Don't tell Robby cuz that sucker AIN'T light.  LOL!  

I have been waiting on some stuff to arrive that I ordered to start getting this done right.  First thing is to remove that gold harlequin design from the glass.  I have a scraper and I'm going to use a mixture of tea tree oil and warm water to remove it.  I'm told it will take patience...Okay.

Next I'm going to paint the interior with Annie Sloan chalk paint in Country Grey.  Then...I'm going to either stencil a design in the back or figure out a way to add paper or vinyl to the back for a pop of contrast.  I don't want anything to fight with what I put in it...but I do want it to be interesting enough to draw the eye.

After that...I'm going to paint the exterior in Annie Sloan's Coco.  

I've removed one of the bail pulls from the drawer at the bottom so that I can find one like it online.  I haven't found one yet but hope to do so before I finish the painting.  I'm also thinking of painting the bottom two inches of the front legs a gold color.  

THIS will take a minute.  LOL!

HAPPY HUMP DAY!  Yall decorated for Christmas yet?????

HELP! Twin Beds with Annie Sloan Chalk Paint in Country Grey

I have two of these beds and am using Annie Sloan chalk paint in Country Grey.  I'm doing one at a time so I can figure out exactly what I want to do to them.  I figure if I do one at a time it will be much easier and quicker to do the second one once I know exactly how I want it to look.

That one has two coats of paint on it and I'm about to play around with dark and clear wax.  The dark wax will give it a weathered look and I guess that would be a good thing in order to hide future knicks but I'm not sure how to go about it just yet.  I like the way it looks on some things but sometimes...the shabby chic look can be a bit too shabby to me you know?  So...that's my dilemma.

I'd like to highlight the details on the beds.

What do YOU think?  Distress the details only or try and lightly distress the entire bed?  Do you like the color I picked?  Remember...they are going in a navy blue bedroom that I want to make gender neutral.  

I've been buying old flag decor and keeping it all together with the receipts in case I change my mind because I saw something recently that REALLY caught my eye that incorporated the color orange in the decor of a navy room.  Nice right?

What would YOU do?  Holla atcha girl.

New Projects!!!!!

Sooooooooo...

I'm taking this whole refinishing furniture thingy by the horns.  LOL!  I'm enjoying it so much!  Taking something well made but in need of modernization feels really good.  

Today I went out to my now new FAVORITE place in the world and returned with two really nice wood twin beds.  Headboard, footboard, rails, et al.  The price was ridiculously awesome and what made it even more awesome is that a family member decided to gift them to me for Christmas and called ahead to pay for them for me.  When I texted the family member to threaten to fight them they were all like...BRING IT!  And...SAY IT WITCHA CHEST!

I decided family shouldn't fight for Christmas and well...they'd prolly win anyway soooooo...

MERRY CHRISTMAS ME!!!!!!  GO ME!  IT'S MY CHRISTMAS!  GO ME!  IT'S MY CHRISTMAS!

THANK YOU THANK YOU THANK YOU!  I FEEL SO BLESSED THAT YOU LOVE ME SO!

So...I'm, of course, chomping at the bit to get them started.  I bought the paint I want to use on them and will probably do them tomorrow.  I'm putting them in a room that is navy blue and I want to make it super relaxing and still fun for guests who are kids.

Now...the thing I'm SUPER DOOPER excited about starting?  THIS!

Maaaaaaaaaan look!  I couldn't fit it in Deuce, of course so I couldn't bring it home.  The Robinator is in deadline mode so he might not be able to help me go get it until Saturday.

WILL I SURVIVE?????????????????????????

This will certainly be a test of patience as I have none when it comes to doing what I want to do when I want to do it.  So now...we wait.  And while we wait...we do the most searching out stuff online to help make it look like I want it to look.  I just ordered this:  AMACO Rub 'n Buff Wax Metallic Finish, Antique Gold, so I could get the brass handles to have a really awesome bright color.  The pull on the top drawer is missing so I need to either find a replace for that one or three to replace them all.  I hope to identify that before I go to bed.  LOL!

I have my Annie Sloan chalk paints already.  I know exactly how I want it to look.  Just gotta get it here and get started.

PATIENCE MONNIE!  PATIENCE!

So...yeah...

I can't do nuttin tonight though.  *sigh*

Easy and Cheap Bath Product Storage!

Yall know I love an organized house!  Seriously...

Sometimes though?  Organizing can be a challenge.  Take this challenge I had.  The tub is WAAAAAAAAAAAAAAAAAAAY over there and there is nothing convenient to store your bath products in that you'd use while taking a bubble bath.  So I had them under the sink first and then on a corner shelf rack but it wasn't really easily accessible for when I needed something while already IN the tub.

I had these two stackable baskets that I was going to use under a sink in the guest bathroom.  And I always have wall hooks.  I put two wall hooks per basket on the wall and hung them baskets from them right at the foot of the tub.  PERFECT!

GO ME!

How easy and awesome is that?????????